Tag Archives: VMware

High write latency on HP StoreVirtual environment with VMware vSphere 5.1

Last week I started a new project with six new HP StoreVirtual storage nodes (HP P4330G3) and four VMware vSphere 5.1U1 ESXi servers. After successfully installing VMware vCenter 5.1U1 I started to notice a big write latency issue on my freshly created storage LUNs. The latency’s ran up to 200ms and sometimes even higher. This was not normal, so I started searching.

First I thought it was the networking. We are using two brand new Cisco 3750x switches, and two existing ones. After a couple of tests and asking the network guys if there is something wrong we concluded that network wise everything was ok. But why the terrible performance on the Storevirtual cluster.

I changed some networking configurations on my VMware ESXi hosts. Still the same high latencies. This was also happening when I copy files from one datastore to another datastore.

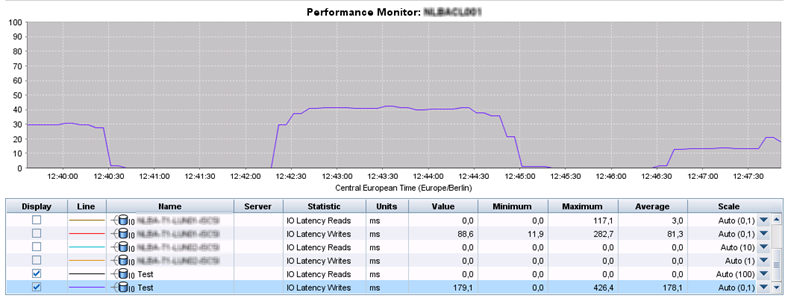
To rule out VMware I created a separate test LUN and connected a physical Windows 2008R2 server to that LUN. I started to copy some big files. Again a very high latency, even up to 400ms.

See screenshot of the Write Latency when copying a big file from Windows 2008R2 to the test LUN. This is a HP StoreVirtual problem I concluded.


I contacted HP Support and explained the problem. They asked me to create a Support Bundle and send it to them. The Support Engineer thought it was an RAID cache problem. There are some units shipped out with the wrong cache settings configured he told me.

So I created the Support Bundle. And send it out to HP. I am a very curious guy and wanted to check out if this was really the problem, so i started searching in the support bundle.

I opened the support bundle file, and located a file called ADUReport.htm which is located deep in the support bundle in a vendorlogs.tar file.

I try to explain where..

  1. Open the file [IP_of_storagenode.tar.gz]
  2. Open mnt\logs\vendorlogs.tar
  3. Open hpadu\ADUReport.htm

This file contains the complete configuration of the StoreVirtual server. Look for the Smart Array P420i subject and check the Cache size settings. 

Screenshot of the wrong settings.


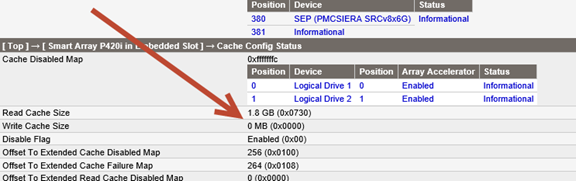
In my case this is not set correctly. I also checked the other nodes. And some of them where correctly configured. 

Screenshot of the correct settings.


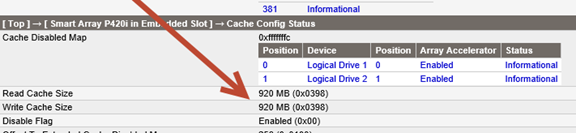
In total, three nodes where wrong and three where correct.

After changing the settings in de RAID controller my latency’s disappeared.. And everything was performing normally again. See screenshot.

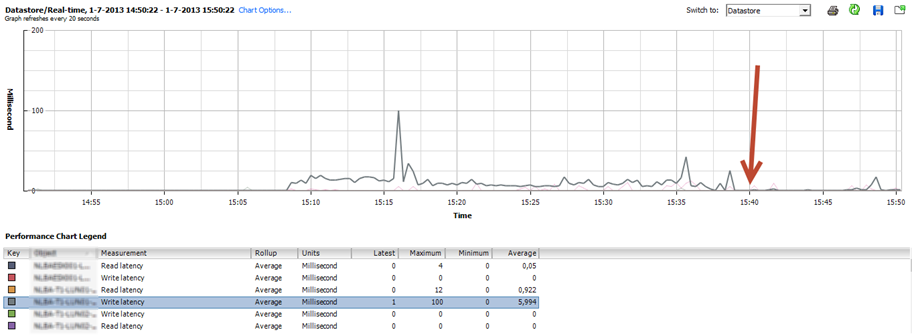
Conclusion, when there is a high write latency on all your LUN’s. Create a support bundle and check the cache settings of the RAID controller. This could be the problem…

Thanks HP for your support and the fix…

VCAP5-DCA Objective 6.1 – Configure, Manage, and Analyze vSphere Log Files

Knowledge

  • Identify vCenter Server log file names and locations
  • Identify ESXi log files names and locations
  • Identify tools used to view vSphere log files

Skills and Abilities

  • Generate vCenter Server and ESXi log bundles
  • Use esxcli system syslog to configure centralized logging on ESXi hosts
  • Test centralized logging configuration
  • Analyze log entries to obtain configuration information
  • Analyze log entries to identify and resolve issues
  • Install and configure VMware syslog Collector and ESXi Dump Collector

Continue reading

Solving the “vami.DNS0.vsphere_Management_Assistance_(vMA)” error

Today I installed a VMware Management Assistance appliance in my home lab. After powering it on the following error message is showing.


I started searching and found an VMware KB article that describes the solution. See VMware KB2007012. There is also a solution posted in the VMware forums, see http://communities.vmware.com/message/1887178 

Solution 1. VMware KB2007012

Cause

This issue can occur if you do not have a predefined set of IP address ranges for the vMA appliance virtual machine to choose from.

Resolution

IP pools provide a network identity to vApps. An IP pool is a network configuration that is assigned to a network used by a vApp. The vApp can then leverage vCenter Server to automatically provide an IP configuration to its virtual machines. You can set up an IP address range by specifying a host address range within a network.

To set up a range:

  1. In the Inventory, select the datacenter that contains the vApp.
  2. On the IP Pools tab, right-click the IP pool you want to edit and select Properties.
    Note:If no IP Pools are present, click Add to add a new IP Pool.
  3. Create a DATA/NFS IP Pool.
  4. Name the IP Pool Name DATA/NFS.
  5. In the Properties dialog, click the IPv4 or the IPv6 tab, depending on your IP protocol.
  6. Enter the IP Subnet and Gateway in the respective fields.
  7. Select the Enable IP Pool check box.
    Note: You must enable this setting to specify an IP address range.
  8. Enter a comma-separated list of host address ranges in the Ranges field. A range is specified as an IP address, a pound sign (#), and a number indicating the length of the range. The gateway and the ranges must be within the subnet, but must exclude the gateway address. For example, 10.20.60.4#10, 10.20.61.0#2 indicates that the IPv4 addresses can range from 10.20.60.4 to 10.209.60.13 and 10.20.61.0 to 10.20.61.1.
  9. Click OK when finished.
  10. Click Associations tab, and select the network that should use the IP Pool.

Now the vMA appliance virtual machine will power on.

Note: Ensure that IPv4 has been enabled for the IP Pool. If this is not enabled, the vApp will fail.

Solution 2. Dissable vApp options.

Edit the settings of the vMA. Go to the options tab and disable vApp options.


Template options grayed out

Today I was trying to remove an old template from my home lab. This was not an easy task because all the options where grayed out. See screenshot of the vSphere Client.


This is also the case in the vSphere Web Client. See second screenshot.

My home lab is running the latest version of VMware vSphere 5.1U1. I checked if the permissions are set correctly, in my case this is correct. I was using the root account of my vCenter appliance. This account had also rights to remove a template. I tried another account, same result.

I started Googling, and found some old posts that described the same problem.

Arne Fokkema created a PowerShell script to solve his problem, but in his case this is for a vSphere 4 environment. See http://ict-freak.nl/2009/08/06/vsphere-deploy-template-grayed-out/
I am using a vSphere 5.1 environment, I tried his solution with some adjustments. Because I have only one template that is not working correctly I had to striped his script into two separate commands. These are:

Set-Template Win2k8R2_Template -ToVM

And

Set-VM Win2k8R2_Template -ToTemplate

After running these commands I was able to delete my template. Problem solved.

vExpert 2013 awardees announced

Last night John Troyer and Corey Romero of VMware announced the vExpert 2013 awards.

We’re pleased to announce the list of vExperts for 2013. Each of these vExperts have demonstrated significant contributions to the community and a willingness to share their expertise with others. We are blown away by the passion and knowledge in this group, a group that is responsible for much of the virtualization evangelism that is taking place in the world — both publicly in books, blogs, online forums, and VMUGs; and privately inside customers and VMware partners. Congratulations to you all!

And guess what…. I am one of them!! This is my first time and I am very happy and proud of it.

I would like to thank John Troyer, Corey Romero, and the VMware Social Media & Community Team for making this possible.

Congratulations to all the other vExperts! The list of vExperts can be found here.


vmw-vexpert


A general system error occured: pending vpxa update.

When you upgrade a VMware vSphere environment the following error can occur when you just updated the VMware vCenter server.


In my case this was an upgrade of VMware vCenter 4.1 to VMware vCenter 5.1 with VMware vSphere ESX 4.1 hosts. In the installation of vCenter I checked the option to upgrade the vCenter agents on the hosts automatically. After the installation of vCenter I checked the status of the hosts. The following error was showing.


This sometimes happens. I started searching for a solution. I found VMware KB1002672 and VMware KB1003714 that describes my problem.

Reading both KB articles my first try was to manually restart the vpxa agent and the management agents. See VMware KB1003490

When reading the different articles my ESX host was already unreachable for my vCenter server. Communication to the host was no problem.

So I started SSH and restarted the management Agents. Then I restarted the vpxa agent service. Both where successful. Now select Connect in vCenter. The installation of the new vpxa agent started again and now it was successful after a couple of minutes. Problem solved.

If there are still problems, see VMware KB1003714 for a manual installation of the vpxa agent.

Solving the Invalid configuration for device ‘0’ error

Today I noticed something strange in our brand new VMware vSphere 5.1 environment. I was trying to patch a Windows 2012 template when I noticed it didn’t have a network connection. This VM is using a Distributed Switch Configuration.


So I checked the VM settings, and indeed it wasn’t connected.

So I checked the Connected box, and the following error appears. Invalid configuration for device ‘0’. See screenshot.

The solution for this error is simple. Connect the network card to another network. Than place it back to the original network. Now it works again.
For more information about this error see the following articles:

Error installing VMware vSphere 5 Client on Windows 8

Last week I was updating my work laptop from Windows 7 to Windows 8 when I ran into an problem with the VMware vSphere 5 Client. This is the error “This product can only be installed on Windows XP SP2 and above”.


This is how I solved this error.

  1. Right-Click VMware-viclient.exe, choose “Properties”
  2. On the “Compatibility” tab, check the “Run this program in compatibility mode for:” and choose “Windows 7″ from the list. Click “Ok”
  3. Run the VMware-viclient installer as you normally would.


Now the installer starts and the Client can be installed. Problem solved.


VMware Workstation 9 released

VMware released VMware Workstation version 9 today.


What’s New in Workstation?

VMware Workstation 9 continues VMware’s tradition of delivering the virtual hardware that technical professionals deserve and rely on every day. With support for Windows 8, restricted VMs, Open GL support for Linux and a new web interface to access virtual machines, it’s the perfect tool for getting work done.


Best in Class Windows 8 Support

To help you and your organization evaluate Windows 8, master the Metro UI and test your applications, VMware Workstation 9 is optimized for running Windows 8 virtual machines and running on Windows 8 PCs. Easy Install simplifies the task of creating Windows 8 virtual machines, Unity mode will intelligently scale windows with Metro applications and multi-touch support will ensure you get the true Windows 8 experience in a virtual machine.


Access from Almost any Device

Workstation’s new web interface allows you to access your virtual machines running in Workstation or vSphere on a tablet, smart phone, PC or any device with a modern browser. No plugins necessary. Now you can power on, off, or suspend your virtual machines and interact with them from almost anywhere.


Set It and Send It

Create virtual machines that are encrypted, block USB devices, require a runtime password, and another password to change virtual machine settings. Once set, send the virtual machine to anyone to run on their Mac, Windows, or Linux machines by using VMware Fusion Professional.


From PC to Datacenter and Back Again

In Workstation 8 we introduced the ability to upload a virtual machine from your PC to vSphere. Workstation 9 takes the next step and allows you to drag and drop a virtual machines form vSphere to your PC. It’s the easiest way to move virtual machines between your PC and your internal cloud.


Better 3D Graphics

With faster 3D graphics and support for DirectX 9.0c Shader Model 3 and OpenGL 2.1 3D graphics in a Windows and now Linux virtual machine, VMware Workstation easily handles demanding 3D applications like AutoCAD, Solidworks, and many current games.

Read the VMware Workstation 9 release notes for a complete list of new features.

Source: VMware

Windows 2008R2 sysprep crashes. Autochk not found

Today I created a clone from a VM that was running. After the clone was completed I disconnected the network card an booted the VM. No problem everything worked. I needed this Cloned VM for a test domain so I syspreped the VM. After booting the VM an error is shown “autochk program not found” after the error a BSOD is shown and the VM reboots.

I started googling and found the solution in the VMware Community pages, see: http://communities.vmware.com/thread/288439?start=15&tstart=0

The sollutions is simpel, boot the VM from the Windows 2008R2 DVD and go the  command prompt. Type the following commands.

diskpart
list volume
select volume 1
attributes volume
attributes volume clear nodefaultdriveletter

Reboot the VM and now the SYSPREP continues.