Knowledge
- Identify Auto Deploy requirements
Skills and Abilities
- Install the Auto Deploy Server
- Utilize Auto Deploy cmdlets to deploy ESXi hosts
- Configure Bulk Licensing
- Provision/Re-provision ESXi hosts using Auto Deploy
-
Configure an Auto Deploy reference host
Install the Auto Deploy Server
Official Documentation:
vSphere Installation and Setup Guide , Chapter 5, “Installing ESXi using vSphere Auto Deploy”, Section “Preparing for vSphere Auto Deploy”, page 73.
Before you can start to use vSphere Auto Deploy, you must prepare your environment. You start with server setup and hardware preparation. You must register the Auto Deploy software with the vCenter Server system that you plan to use for managing the hosts you provision, and install the VMware PowerCLI.
Prepare Your System and Install the Auto Deploy Server
Before you turn on a host for PXE boot with vSphere Auto Deploy, you must install prerequisite software and set up the DHCP and TFTP servers that Auto Deploy interacts with.
CAUTION If you set up Auto Deploy to boot a host, vSphere checks each of the local storage devices on the system for existing partitions. To avoid the possibility of data loss, vSphere does not create partitions under the following conditions:
- A local storage device contains a GPT partition map.
- A local storage device contains an MBR partition table that defines at least one partition.
- Storage is remote.
If hosts have local storage with a partition table that vSphere does not recognize, such as Linux Logical Volume Manager, vSphere overwrites the storage and creates new partitions. To make sure local storage is not considered for partitioning, you can physically disconnect that storage.
Prerequisites
- Ensure that the hosts you will provision with Auto Deploy meet the hardware requirements for ESXi 5.0. See “ESXi Hardware Requirements,”on page 29.
NOTE You cannot provision EFI hosts with Auto Deploy unless you switch the EFI system to BIOS compatibility mode.
- Ensure that the ESXi hosts have network connectivity to vCenter Server and that all port requirements are met.
See “Required Ports for vCenter Server,”on page 38.
- Do not use VLAN tagged networks at the boot NIC. If you want to specify VLAN IDs, you must make sure that the host can reach the DHCP server when the host starts the boot process. Check with your network administrator how VLAN IDs are used in your environment.
- Ensure that you have enough storage for the Auto Deploy repository. The Auto Deploy server uses the repository to store data it needs, including the rules and rule sets you create and the VIBs and image profiles that you specify in your rules.
Best practice is to allocate 2GB to have enough room for four image profiles and some extra space. Each image profile requires approximately 350MB. Determine how much space to reserve for the Auto Deploy repository by considering how many image profiles you expect to use.
- Obtain the vCenter Server installation media, which include the Auto Deploy installer, or deploy the vCenter Server Appliance.
See Chapter 11, “Installing vCenter Server,”on page 201.
- Ensure that a TFTP server is available in your environment. If you require a supported solution, purchase a supported TFTP server from your vendor of choice.
- Obtain administrative privileges to the DHCP server that manages the network segment you want to boot from. You can use a DHCP server already in your environment, or install a DHCP server.
“Sample DHCP Configuration,”on page 21shows sample files for a regular scripted installation. For your Auto Deploy setup, replace the gpxelinux.0file name with undionly.kpxe.vmw-hardwired.
- Secure your network as you would for any other PXE-based deployment method. Auto Deploy transfers data over SSL to prevent casual interference and snooping. However, the authenticity of the client or the Auto Deploy server is not checked during a PXE boot. See “Auto Deploy Best Practices and Security Consideration,”on page 97.
NOTE Auto Deploy is not supported with NPIV (N_Port ID Virtualization).
- Set up a remote Syslog server. See the vCenter Server and Host Managementdocumentation for Syslog server configuration information. Configure the first host you boot to use the remote syslog server and apply that host’s host profile to all other target hosts. Optionally, install and use the vSphere Syslog Collector, a vCenter Server support tool that provides a unified architecture for system logging and enables network logging and combining of logs from multiple hosts.
- Install ESXi Dump Collector and set up your first host so all core dumps are directed to ESXi Dump Collector and apply the host profile from that host to all other hosts. See “Configure ESXi Dump Collector with ESXCLI,”on page 87 and “Set Up ESXi Dump Collector from the Host Profiles Interface,”on page 89.
See “Install vSphere ESXi Dump Collector,”on page 212.
Procedure
- Install the vSphere Auto Deploy server as part of a vCenter Server installation or standalone on a Windows system, or deploy the vCenter Server Appliance to an ESXi system of your choice.
| Location | Description |
| vCenter Server system | Use the vCenter Server installation media to install Auto Deploy on the samehost as the vCenter Server system itself. That vCenter Server system managesall hosts that you provision with this Auto Deploy installation.
See “Install vSphere Auto Deploy,”on page 214. |
| Windows system | Use the vCenter Server installation media to install Auto Deploy on aMicrosoft Windows system that does not have a vCenter Server systeminstalled. The installer prompts you for a vCenter Server system to register
Auto Deploy with. That vCenter Server system manages all hosts that you provision with this Auto Deploy installation. See “Install vSphere Auto Deploy,”on page 214. |
| vCenter Server Appliance | Deploy the vCenter Server Appliance to the ESXi host of your choice. Theappliance includes an Auto Deploy server, which is disabled by default.By default, the vCenter Server system on the appliance manages all hosts
you provision with the appliance Auto Deploy installation. Other configurations are supported. See “Using Auto Deploy with the VMware vCenter Server Appliance,”on page 92. |
-
Configure the TFTP server.
- In a vSphere Client connected to the vCenter Server system that Auto Deploy is registered with, click Home in the navigation bar and select Auto Deployin the Administration tab to display the Auto Deploy page.
- Click Download TFTP ZIPto download the TFTP configuration file and unzip the file to the directory in which your TFTP server stores files.
- In a vSphere Client connected to the vCenter Server system that Auto Deploy is registered with, click Home in the navigation bar and select Auto Deployin the Administration tab to display the Auto Deploy page.
-
Set up your DHCP server to point to the TFTP server on which the TFTP ZIP file is located.
- Specify the TFTP Server’s IP address in DHCP option 66 (frequently called next-server).
- Specify the boot file name, which is undionly.kpxe.vmw-hardwiredin the DHCP option 67 (frequently called boot-filename).
- Specify the TFTP Server’s IP address in DHCP option 66 (frequently called next-server).
- Set each host you want to provision with Auto Deploy to network boot or PXE boot, following the manufacturer’s instructions.
- Locate the image profile you want to use and the depot in which it is located.
In most cases, you point to an image profile VMware makes available in a public depot. If you want to include custom VIBs with the base image, you can use the Image Builder PowerCLI create an image profile and use that image profile. See the Image Builder PowerCLIdocumentation.
- Write a rule that assigns an image profile to hosts.
-
(Optional) You can use your own Certificate Authority (CA) by replacing the OpenSSL certificate (rbdca.crt) and the OpenSSL private key (rbd-ca.key) with your own certificate and key file.
- On Windows, the files are in the SSL subfolder of the Auto Deploy installation directory. For example, on Windows 7 the default is C:\ProgramData\VMware\VMware vSphere Auto Deploy\ssl.
- On the vCenter Server Appliance, the files are in /etc/vmware-rbd/ssl/.
- On Windows, the files are in the SSL subfolder of the Auto Deploy installation directory. For example, on Windows 7 the default is C:\ProgramData\VMware\VMware vSphere Auto Deploy\ssl.
When you start a host that is set up for Auto Deploy, it contacts the DHCP server and is directed to the Auto Deploy server, which provisions the host with the image specified in the active rule set.
What to do next
- Install PowerCLI. See “Install PowerCLI and Prerequisite Software,”on page 75.
- Use the PowerCLI cmdlets to define a rule that assigns an image profile and optional host profile to the host. See “Prepare Your System and Install the Auto Deploy Server,”on page 73.
- Configure the first host your provision to use the storage, networking, and other settings you want for your target hosts to share. Create a host profile for that host and write a rule that assigns both the already tested image profile and the host profile to target hosts.
- If you have to configure host-specific information, set up the host profile of the reference host to prompt for user input. See “Customizing Hosts with Answer Files,”on page 94.
Utilize Auto Deploy cmdlets to deploy ESXi hosts
Official Documentation:
vSphere Installation and Setup Guide , Chapter 5, “Installing ESXi using vSphere Auto Deploy”, Section “Auto Deploy PowerCLI Cmdlet Overview”, page 71.
You specify the rules that assign image profiles and host profiles to hosts using a set of PowerCLI cmdlets that are included in VMware PowerCLI.
If you are new to PowerCLI, read the PowerCLI documentation and review “Using Auto Deploy Cmdlets,” on page 76. You can get help for any command at the PowerShell prompt.
- Basic help: Get-Help cmdlet_name
- Detailed help: Get-Help cmdlet_name -Detailed
NOTE When you run Auto Deploy cmdlets, provide all parameters on the command line when you invoke the cmdlet. Supplying parameters in interactive mode is not recommended.
| Command | Description |
| Get-DeployCommand | Returns a list of Auto Deploy cmdlets. |
| New-DeployRule | Creates a new rule with the specified items and patterns. |
| Set-DeployRule | Updates an existing rule with the specified items andpatterns. You cannot update a rule that is part of a rule set. |
| Get-DeployRule | Retrieves the rules with the specified names. |
| Copy-DeployRule | Clones and updates an existing rule. |
| Add-DeployRule | Adds one or more rules to the working rule set and, bydefault, also to the active rule set. Use the NoActivateparameter to add a rule only to the working rule set. |
| Remove-DeployRule | Removes one or more rules from the working rule set andfrom the active rule set. Run this command with the -Deleteparameterto completely delete the rule. |
| Set-DeployRuleset | Explicitly sets the list of rules in the working rule set. |
| Get-DeployRuleset | Retrieves the current working rule set or the current activerule set. |
| Switch-ActiveDeployRuleset | Activates a rule set so that any new requests are evaluatedthrough the rule set. |
| Get-VMHostMatchingRules | Retrieves rules matching a pattern. For example, you canretrieve all rules that apply to a host or hosts. Use this cmdletprimarily for debugging. |
| Test-DeployRulesetCompliance | Checks whether the items associated with a specified hostare in compliance with the active rule set. |
| Repair-DeployRulesetCompliance | Given the output of Test-DeployRulesetCompliance, thiscmdlet updates the image profile, host profile, and locationfor each host in the vCenter Server inventory. The cmdlet
might apply image profiles, apply host profiles, or move hosts to prespecified folders or clusters on the vCenter Server system. |
| Apply-EsxImageProfile | Associates the specified image profile with the specified host. |
| Get-VMHostImageProfile | Retrieves the image profile in use by a specified host. Thiscmdlet differs from the Get-EsxImageProfilecmdlet in theImage Builder PowerCLI. |
| Repair-DeployImageCache | Use this cmdlet only if the Auto Deploy image cache isaccidentally deleted. |
| Get-VMHostAttributes | Retrieves the attributes for a host that are used when the AutoDeploy server evaluates the rules. |
| Get-DeployMachineIdentity | Returns a string value that Auto Deploy uses to logically linkan ESXi host in vCenter to a physical machine. |
| Set-DeployMachineIdentity | Logically link a host object in the vCenter Server database toa physical machine. Use this cmdlet to add hosts withoutspecifying rules. |
Install PowerCLI and Prerequisite Software
Before you can run Auto Deploy cmdlets to create and modify the rules and rule sets that govern Auto Deploy behavior, you must install vSphere PowerCLI and all prerequisite software. The Auto Deploy cmdlets are included with the PowerCLI installation.
You install vSphere PowerCLI and prerequisite software on a Microsoft Windows system. See the Microsoft Web site for information about installing the Microsoft software. See the vSphere PowerCLI Installation Guide for detailed instructions for PowerCLI installation.
Procedure
- Verify that Microsoft .NET 2.0 is installed, or install it from the Microsoft Web site following the instructions on that Web site.
- Verify that Microsoft Powershell 2.0 is installed, or install it from the Microsoft website following the instructions on that Web site.
- Install vSphere vSphere PowerCLI, which includes the Auto Deploy cmdlets.
What to do next
Review “Using Auto Deploy Cmdlets,”on page 76. If you are new to PowerCLI, read the PowerCLI documentation.
Use Auto Deploy cmdlets and other PowerCLI cmdlets and PowerShell cmdlets to manage Auto Deploy rules and rule sets. Use Get-Help <cmdlet_name>at any time for command-line help
Configure Bulk Licensing
Official Documentation:
vSphere Installation and Setup Guide , Chapter 5, “Installing ESXi using vSphere Auto Deploy”, Section “Set Up Bulk Licensing”, page 77.
You can use the vSphere Client or ESXi Shell to specify individual license keys, or you can set up bulk licensing by using PowerCLI cmdlets. Bulk licensing works for all ESXi hosts, but is especially useful for hosts provisioned with Auto Deploy.
The following example assigns licenses to all hosts in a data center. You can also associate licenses with hosts and clusters.
The following example is for advanced PowerCLI users who know how to use PowerShell variables.
Prerequisites
Install PowerCLI. See “Install PowerCLI and Prerequisite Software,”on page 75.
Assigning license keys through the vSphere Client or assigning licensing by using PowerCLI cmdlets function differently.
| Assign license keys withvSphere Client | You can assign license keys to a host when you add the host to the vCenterServer system or when the host is managed by a vCenter Server system. |
| Assign license keys withLicenseDataManagerPowerCLI | You can specify a set of license keys to be added to a set of hosts. The licensekeys are added to the vCenter Server database. Each time a host is added to thevCenter Server system or reconnects to the vCenter Server system, the host is
assigned a license key. A license key that is assigned through the PowerCLI is treated as a default license key. When an unlicensed host is added or reconnected, it is assigned the default license key. If a host is already licensed, it keeps its license key. |
Procedure
- Connect to the vCenter Server system you want to use and bind the associated license manager to a variable.
Connect-VIServer -Server 192.XXX.X.XX -User username-Password password
$licenseDataManager = Get-LicenseDataManager
- Run a cmdlet that retrieves the datacenter in which the hosts for which you want to use the bulk licensing feature are located.
$hostContainer = Get-Datacenter -Name Datacenter-X
You can also run a cmdlet that retrieves a cluster to use bulk licensing for all hosts in a cluster, or retrieves a folder to use bulk licensing for all hosts in a folder.
- Create a new LicenseDataobject and a LicenseKeyEntryobject with associated type ID and license key.
$licenseData = New-Object VMware.VimAutomation.License.Types.LicenseData
$licenseKeyEntry = New-Object Vmware.VimAutomation.License.Types.LicenseKeyEntry
$licenseKeyEntry.TypeId = “vmware-vsphere”
$licenseKeyEntry.LicenseKey = “XXXXX-XXXXX-XXXXX-XXXXX-XXXXX”
- Associate the LicenseKeysattribute of the LicenseDataobject you created in step 3 with the LicenseKeyEntryobject.
$licenseData.LicenseKeys += $licenseKeyEntry
- Update the license data for the data center with the LicenseDataobject and verify that the license is associated with the host container.
$licenseDataManager.UpdateAssociatedLicenseData($hostContainer.Uid, $licenseData)
$licenseDataManager.QueryAssociatedLicenseData($hostContainer.Uid)
- Provision one or more hosts with Auto Deploy and assign them to the data center or cluster that you assigned the license data to.
-
Verify that the host is successfully assigned to the default license XXXXX-XXXXX-XXXXX-XXXXX-XXXXX.
- Using a vSphere Client, log in to the vCenter Server system.
- Navigate to the Configuration > License Features tab for the host and check that the correct license is displayed.
- Using a vSphere Client, log in to the vCenter Server system.
All hosts that you assigned to the data center are now licensed automatically.
Provision/Re-provision ESXi hosts using Auto Deploy
Official Documentation:
vSphere Installation and Setup Guide , Chapter 5, “Installing ESXi using vSphere Auto Deploy”, Section “Provisioning ESXi Systems with vSphere Auto Deploy”, page 82.
vSphere Auto Deploy can provision hundreds of physical hosts with ESXi software. You can provision hosts that did not previously run ESXi software (first boot), reboot hosts, or reprovision hosts with a different image profile, host profile, or folder or cluster location.
The Auto Deploy process differs depending on the state of the host and on the changes that you want to make.
Provision a Host (First Boot)
Provisioning a host that has never been provisioned with Auto Deploy (first boot) differs from subsequent boot processes. You must prepare the host, define the image using the Image Builder PowerCLI, and fulfill all other prerequisites before you can provision the host.
Prerequisites
- Make sure your host meets the hardware requirements for ESXi hosts. See “ESXi Hardware Requirements,”on page 29.
- Prepare the system for vSphere Auto Deploy (see “Preparing for vSphere Auto Deploy,”on page 73).
- Write rules that assign an image profile to the host and optionally assign a host profile and a vCenter Server location to the host. See “Managing Auto Deploy with PowerCLI Cmdlets,”on page 78.
When setup is complete, the Auto Deploy server and PowerCLI are installed, DHCP setup is complete, and rules for the host that you want to provision are in the active rule set.
Procedure
- Turn on the host.
The host contacts the DHCP server and downloads gPXE from the location the server points it to. Next, the Auto Deploy server provisions the host with the image specified by the rule engine. The Auto Deploy server might also apply a host profile to the host if one is specified in the rule set. Finally, Auto Deploy adds the host to the vCenter Server system that is specified in the rule set.
- (Optional) If Auto Deploy applies a host profile that requires user input such as an IP address, the host is placed in maintenance mode. In the vSphere Client, check the answer file or reapply the host profile and provide the user input when prompted.
The information is stored in an answer file that is associated with the host.
After the first boot process, the host is running and managed by a vCenter Server system. The vCenter Server stores the host’s image profile, host profile, and location information.
You can now reboot the host as needed. Each time you reboot, the host is reprovisioned by the vCenter Server system.
Configure an Auto Deploy reference host
Official Documentation:
vSphere Installation and Setup Guide , Chapter 5, “Installing ESXi using vSphere Auto Deploy”, Section “Setting up an Auto Deploy Reference Host”, page 85.
In an environment where no state is stored on the host, a reference host helps you set up multiple hosts with the same configuration. You configure the reference host with the logging, coredump, and other settings that you want, save the host profile, and write a rule that applies the host profile to other hosts as needed.
You can configure the storage, networking, and security settings on the reference host and set up services such as syslog and NTP.
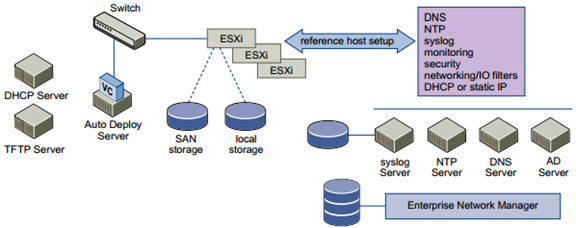
Understanding Reference Host Setup
A well-designed reference host connects to all services such as Syslog, NTP, and so on. The reference host might also include setup of security, storage, networking, and ESXi Dump Collector.
The exact setup of your reference host depends on your environment, but you might consider the following customization.
| NTP Server Setup | When you collect logging information in large environments, you must makesure that log times are coordinated. Set up the reference host to use the NTPserver in your environment that all hosts can share. You can specify an NTP
server with the vicfg-ntp command. You can start and stop the NTP service for a host with the vicfg-ntp command or the vSphere Client. |
| Syslog Server Setup | All ESXi hosts run a syslog service (vmsyslogd), which logs messages from theVMkernel and other system components to a file. You can specify the log hostand manage the log location, rotation, size, and other attributes with the esxcli
system syslog vCLI command or with the vSphere Client. Setting up logging on a remote host is especially important for hosts provisioned with Auto Deploy that have no local storage. You can optionally install the vSphere Syslog Collector to collect logs from all hosts. |
| Core Dump Setup | You can set up your reference host to send core dumps to a shared SAN LUN,or you can install ESXi Dump Collector in your environment and set up thereference host to use ESXi Dump Collector. See “Configure ESXi Dump
Collector with ESXCLI,”on page 87. You can either install ESXi Dump Collector by using the vCenter Server installation media or use the ESXi Dump Collector that is included in the vCenter Server Appliance. After setup is complete, VMkernel memory is sent to the specified network server when the system encounters a critical failure. |
| Security Setup | In most deployments, all hosts that you provision with Auto Deploy must havethe same security settings. Make any customization in your reference host. Youcan, for example, set up the firewall to allow certain services access to the ESXi
system. See the vSphere Securitydocumentation. Security setup includes shared user access settings for all hosts. You can achieve unified user access by setting up your reference host for Microsoft Active Directory. If you set up Active Directory by using host profiles, the passwords are not protected. Use the vSphere Authentication Service to set up Active Directory to avoid exposing the Active Directory password. |
| Networking and StorageSetup | If you reserve a set of networking and storage resources for use by hostsprovisioned with Auto Deploy, you can set up your reference host to use thoseresources. |
In very large deployments, the reference host setup supports an Enterprise Network Manager, which collects all information coming from the different monitoring services in the environment.
Configuring an Auto Deploy Reference Host
vSphere allows you to configure a reference host by using the vSphere Client, by using vCLI, or by using host profiles.
To set up a host profile, you can use the approach that suits you best.
| vSphere Client | The vSphere Client supports setup of networking, storage, security, and mostother aspects of an ESXi host. You can completely set up your environment andexport the host profile for use by Auto Deploy. |
| vSphere Command-LineInterface | You can use vCLI commands for setup of many aspects of your host. vCLI isespecially suitable for configuring some of the services in the vSphereenvironment. Commands include vicfg-ntp(set up an NTP server), esxcli
system syslog(set up a syslog server), and vicfg-route(set up the default route). See “Configure ESXi Dump Collector with ESXCLI,”on page 87. |
| Host Profiles Interface | You can either set up a host with vSphere Client or vCLI and save the hostprofile for that host, or you can configure the host profiles directly with theHost Profiles interface in the vSphere Client. See “Configure Host Profiles for
an Auto Deploy Reference Host,”on page 88. |
Configure ESXi Dump Collector with ESXCLI
A core dump is the state of working memory in the event of host failure. By default, a core dump is saved to the local disk. You can use ESXi Dump Collector to keep core dumps on a network server for use during debugging. ESXi Dump Collector is especially useful for Auto Deploy, but is supported for any ESXi host. ESXi Dump Collector supports other customization, including sending core dumps to the local disk.
Prerequisites
Install the ESXi Dump Collector, a support tool included with the vCenter Server autorun.exeapplication and
also included in the vCenter Server Appliance.
Install vCLI if you want to configure the host to use ESXi Dump Collector. In troubleshooting situations, you
can use ESXCLI in the ESXi Shell instead.
Procedure
- Set up an ESXi system to use ESXi Dump Collector by running esxcli system coredumpin the local ESXi shell or by using vCLI.
esxcli system coredump network set –interface-name vmk0 –server-ipv4 10xx.xx.xx.xx –serverport 6500
You must specify a VMkernel NIC and the IP address and optional port of the server to send the core dumps to. If you configure an ESXi system that is running inside a virtual machine that is using a vSphere standard switch, you must choose a VMkernel port that is in promiscuous mode. ESXi Dump Collector is not supported on vSphere distributed switches.
- Enable ESXi Dump Collector.
esxcli system coredump network set –enable true
- (Optional) Check that ESXi Dump Collector is configured correctly.
esxcli system coredump network get
The host on which you have set up ESXi Dump Collector is set up to send core dumps to the specified server by using the specified VMkernel NIC and optional port.
What to do next
- Write a rule that applies the host profile to all hosts that you want to provision with the settings that you specified in the reference host (see “Assign a Host Profile to Hosts,”on page 80).
- For hosts already provisioned with Auto Deploy, perform the compliance testing and repair operations to provision them with the new host profile. See “Test and Repair Rule Compliance,”on page 81.
- Turn on unprovisioned hosts to provision them with the new host profile
Configure Host Profiles for an Auto Deploy Reference Host
You can set up host profiles in a reference host and apply those host profile settings to all other hosts provisioned with vSphere Auto Deploy. You can either configure the reference host and export the host profile
or, for small changes, edit the host profiles directly.
Prerequisites
Install a vSphere Client to access the vCenter Server system that manages the host that you want to use as a reference host.
Procedure
- Use a vSphere Client to connect to the vCenter Server system.
- Select the host and select View > Management > Host Profiles.
- For a new profile, click Create Profile, or right-click a profile that you want to modify and select Edit Profile.
- In the Edit Profile dialog, select the fields for the policy that you want to set up.
| Policy | Description |
| ESXi Dump Collector | Set up ESXi Dump Collector with the esxcli system coredumpcommandand save the host profile (best practice), or configure the host profile directly. |
| Syslog | Set up syslog for the host with the esxcli system syslogcommand. Savethe host profile (best practice) or configure the host profile directly. See “SetUp Syslog from the Host Profiles Interface,”on page 90. |
| NTP | Use the vicfg-ntpvCLI command or the vSphere Client to set up a host. Ifyou use the vSphere Client to start the NTP Server, make sure the startuppolicy for the NTP Daemon is set appropriately.
|
| Security | Set up the Firewall configuration, Security configuration, User configuration,and User Group configuration for the reference host with the vSphere Clientor with vCLI commands. |
| Networking and Storage | Set up the Networking and Storage policies for the reference host with thevSphere Client or vCLI command. |
- Click OKto save the host profile settings.
What to do next
Write a rule that applies the host profile to all hosts that you want to provision with the settings that you specified in the reference host (see “Assign a Host Profile to Hosts,”on page 80), and perform a test and repair compliance operation.
Other exam notes
- The Saffageek VCAP5-DCA Objectives http://thesaffageek.co.uk/vcap5-dca-objectives/
- Paul Grevink The VCAP5-DCA diaries http://paulgrevink.wordpress.com/the-vcap5-dca-diaries/
- Edward Grigson VCAP5-DCA notes http://www.vexperienced.co.uk/vcap5-dca/
- Jason Langer VCAP5-DCA notes http://www.virtuallanger.com/vcap-dca-5/
- The Foglite VCAP5-DCA notes http://thefoglite.com/vcap-dca5-objective/
VMware vSphere official documentation
| VMware vSphere Basics Guide | html | epub | mobi | |
| vSphere Installation and Setup Guide | html | epub | mobi | |
| vSphere Upgrade Guide | html | epub | mobi | |
| vCenter Server and Host Management Guide | html | epub | mobi | |
| vSphere Virtual Machine Administration Guide | html | epub | mobi | |
| vSphere Host Profiles Guide | html | epub | mobi | |
| vSphere Networking Guide | html | epub | mobi | |
| vSphere Storage Guide | html | epub | mobi | |
| vSphere Security Guide | html | epub | mobi | |
| vSphere Resource Management Guide | html | epub | mobi | |
| vSphere Availability Guide | html | epub | mobi | |
| vSphere Monitoring and Performance Guide | html | epub | mobi | |
| vSphere Troubleshooting | html | epub | mobi | |
| VMware vSphere Examples and Scenarios Guide | html | epub | mobi |
Disclaimer.
The information in this article is provided “AS IS” with no warranties, and confers no rights. This article does not represent the thoughts, intentions, plans or strategies of my employer. It is solely my opinion.