Author Archives: Marco

About Marco

Marco works for ViaData as a Senior Technical Consultant. He has over 15 years experience as a system engineer and consultant, specialized in virtualization. VMware VCP4, VCP5-DC & VCP5-DT. VMware vExpert 2013, 2014,2015 & 2016. Microsoft MCSE & MCITP Enterprise Administrator. Veeam VMSP, VMTSP & VMCE.

FREE Exchange 2010 Training

Exchange 2010 Upgrade and Deployment (HOLO)

This 300 level hands-on labs online course (including seven hands-on labs) will prepare learners with the knowledge to engage with customers to help them implement best practices for smooth Exchange 2010 upgrades and deployments. These hands-on labs online (HOLOs) are provided at no charge to Microsoft partners, and provide IT Professionals with the essential information they need to setup, deploy, and configure Microsoft Exchange Server 2010.  The course will address gaps in knowledge around topics such as new features, upgrade paths, tools and processes to support upgrade and deployment planning.

Training includes the following curriculum:

Course (Online): Using Exchange 2010 Tools to Plan a Deployment (Part 1)

Course (Online): Using Exchange Tools to Plan a Deployment (Part 2)

Course (Online): Exchange 2010 Setup, Deployment, and Server Role Configuration

Course (Online): Configuring Mail Flow and Outlook Web Access

Course (Online): Moving Mailboxes to Exchange 2010

Course (Online): Moving Other Services to Exchange 2010 (Part 1)

Course (Online): Moving Other Services to Exchange 2010 (Part 2)

Microsoft Test Lab Guides

Recently Microsoft released a lot of Lab Guides for different Microsoft products to test. See http://social.technet.microsoft.com/wiki/contents/articles/test-lab-guides.aspx

Test Lab Guides

Test lab guides (TLGs) allow you to get valuable hands-on experience with new products and technologies using a pre-defined and tested methodology that results in a working configuration. When you use a TLG to create a test lab, instructions define what servers to create, how to configure the operating systems and system services, and how to install and configure any additional products or technologies. A TLG experience enables you to see all of the components and the configuration steps on both the front-end and back-end that are required for a product or technology or for a multi-product or technology solution.

A challenge in creating useful TLGs is to enable their reusability and extensibility. Because creating a test lab can represent a significant investment of time and resources, your ability to reuse and extend the work required to create test labs is important. An ideal test lab environment would enable you to create a basic lab configuration, save that configuration, and then build out multiple test lab scenarios in the future by starting with the base configuration.

For a test lab based on physical computers, you can image the drives for future test labs. For a test lab based on virtual machines, you can create snapshots for future test labs. This allows you to easily return to a desired configuration for further learning and experimentation.

The types of TLG documents are the following:

  • Base configuration TLG
  • Modular TLGs
  • TLG extensions
  • Troubleshooting TLGs
  • Test lab troubleshooting scenarios
  • TLG portal pages

Base Configuration TLG

The Base Configuration TLG allows you to create the base configuration test lab, upon which you can build test labs based on other TLGs from Microsoft, TLG extensions in the TechNet Wiki, or a test lab of your own design that can include Microsoft or non-Microsoft products.

The base configuration TLG is just the beginning of the test lab experience. Other TLGs or TLG extensions in the TechNet Wiki focus on Microsoft products or platform technologies, but all of them use the Base Configuration TLG as a starting point.

After configuring the computers of the base configuration test lab, make sure that you perform a disk image on each computer if you are using physical computers, or perform virtual machine snapshots if you are using virtual machines.

Modular TLGs

A modular TLG describes how to set up and demonstrate a technology, product, or solution for either the Base Configuration test lab or a test lab based on another modular TLG.

The following modular TLGs are available:

To create your own modular TLG in the TechNet Wiki, see the Wiki: Modular Test Lab Guide Template.

TLG Extensions

A TLG extension article, published in the TechNet Wiki, describes how to configure additional functionality or advanced or uncommon configurations based on a working test lab. A TLG extension extends a modular TLG.

The TLG extension article includes instructions to configure and test the additional functionality, and then manually restore the test lab to its original state. A TLG extension article also includes virtualization advice so that you can create snapshots to store the modified test lab configuration and easily restore the original working test lab configuration.

Examples of TLG extensions are the following:

To create your own TLG extension, see Wiki: Test Lab Extension Template.

Troubleshooting TLGs

A troubleshooting TLG describes the troubleshooting tools and how they appear in a working test lab for a technology, product, or multi-technology and product solution. The working test lab is typically based on a modular TLG.

A troubleshooting TLG also takes you through a set of troubleshooting scenarios. Each troubleshooting scenario steps you through the following:

  • Breaking the configuration of the test lab in a specific way
  • Demonstrating the effect on the technology or product functionality
  • Performing root cause analysis of the problem using the troubleshooting tools and recommended troubleshooting techniques
  • Correcting the problem

The following troubleshooting TLGs are available:

To create your own troubleshooting TLG in the TechNet Wiki, see the Wiki: Troubleshooting Test Lab Guide Template.

Test Lab Troubleshooting Scenarios

A test lab troubleshooting scenario, published in the TechNet Wiki, provides an additional scenario to demonstrate the results of a misconfiguration or other type of common problem and guide the reader through the root cause determination and correction. Test lab troubleshooting scenarios extend a troubleshooting TLG.

For an example of a test lab troubleshooting scenario, click here.

To create your own test lab troubleshooting scenario, see Wiki: Test Lab Troubleshooting Scenario Template.

TLG Portal Pages

A TLG portal page is a TechNet Wiki article that provides links to all of the resources for a specific technology or product.

The following TLG portal pages are available:

Additional Resources

For the latest information about TLGs, see the Microsoft TLG blog.

Best practices for virtual machine snapshots in the VMware environment

After troubleshooting some problems with snapshots I ran in to an article on the VMware Knowledge base with some good info. See document ID 1025279 at http://kb.vmware.com/selfservice/search.do?cmd=displayKC&docType=kc&externalId=1025279

This is the article.

Purpose

This article provides best practice information for snapshots. It also provides links to resources that help you understand snapshots and troubleshoot snapshot issues.

Resolution

Best practices

  • Snapshots are not backups. As the snapshot file is only a change log of the original virtual disk, do not rely upon it as a direct backup process. The virtual machine is running on the most current snapshot, not the original vmdk disk files.
  • The maximum supported amount in a chain is 32. However, VMware recommends that you use only 2-3 snapshots in a chain.
  • Use no single snapshot for more than 24-72 hours.
    • This prevents snapshots from growing so large as to cause issues when deleting/committing them to the original virtual machine disks. Take the snapshot, make the changes to the virtual machine, and delete/commit the snapshot as soon as you have verified the proper working state of the virtual machine.
    • Be especially diligent with snapshot use on high-transaction virtual machines such as email and database servers. These snapshots can very quickly grow in size, filling datastore space. Commit snapshots on these virtual machines as soon as you have verified the proper working state of the process you are testing.|
  • If using a third party product that takes advantage of snapshots (such as virtual machine backup software), regularly monitor systems configured for backups to ensure that no snapshots remain active for extensive periods of time.
    • Snapshots should only be present for the duration of the backup process.
    • Snapshots taken by third party software (called via API) may not show up in the vCenter Snapshot Manager. Routinely check for snapshots via the command-line.
  • An excessive number of snapshots in a chain or snapshots large in size may cause decreased virtual machine and host performance.
  • Configure automated vCenter Server alarms to trigger when a virtual machine is running from snapshots. For more information, see Configuring VMware vCenter Server to send alarms when virtual machines are running from snapshots (1018029).
  • Confirm that there no snapshots are present (via command line) before a Storage vMotion. If snapshots are present, delete them prior to the Storage vMotion. For more information, see Migrating an ESX 3.x virtual machine with snapshots in powered-off or suspended state to another datastore might cause data loss and make the virtual machine unusable (1020709).
  • Confirm that there are no snapshots present (via command line) before increasing the size of any Virtual Machine virtual disk or virtual RDM. If snapshots are present, delete them prior to increasing the size of the disk/s. Increasing the size of a disk with snapshots present can lead to corruption of the snapshots and potential data loss. For more information, see Increasing the Size of a Virtual Disk.

Continue reading

Renaming a virtual machine and its files

When I was renaming some virtual machines in my test lab, I discovered that the file names are not renamed with the virtual machine. In the future this may be causing some problems so I was looking for a method to rename the files also. On the VMware site I’ve found a knowledgebase article about it. It describes the correct way to rename also the files. See KB Article: 1029513. Original link: http://kb.vmware.com/selfservice/search.do?cmd=displayKC&docType=kc&externalId=1029513

Purpose

This article provides steps to rename a virtual machine and its files.
These steps may be useful if you rename a virtual machine, but its files retain the original file names. You may want to rename the virtual machine disk files to prevent possible confusion.

Resolution

The content of the displayName configuration option is updated when you rename a virtual machine. However, the underlying files are not renamed.

Renaming the files

To rename the files:
  1. Log into the VMware vSphere Client.
  2. Locate the virtual machine in your host inventory.
  3. Begin a Storage vMotion or an offline Storage Migration of the virtual machine.For more information, see :
  4. The destination copy’s file names are be updated to your desired values.

If this is not an option, you may also rename the files by hand after the virtual machine has been powered down.

Manually renaming virtual machine files

Warning: Before proceeding, ensure that:

  • The virtual machine has a current backup and that it has been powered down.
  • The virtual machine does not have snapshots or virtual disks shared with other virtual machines.

To manually rename the virtual machine’s files:

  1. Log into the VMware vSphere Client.
  2. Locate the virtual machine in your host inventory.
  3. Power down the virtual machine.
  4. Right-click on the virtual machine and choose Remove from inventory.
  5. Connect to the terminal of the ESX server via SSH, System Management Interface, or directly at its console, and log in.Note: For additional instructions for ESXi, see Tech Support Mode for Emergency Support (1003677).
  6. Navigate to the directory containing the virtual machine. For example, cd /vmfs/volumes/<datastore>/<virtual machine>/.
  7. Run this command to rename the virtual disk files:vmkfstools -E “originalname.vmdk” “newname.vmdk”Note: Is it unnecessary to once again rename the originalname-flat.vmdk file after running the vmkfstools command.
  8. Copy the virtual machine configuration file (.vmx) using the command:cp “originalname.vmx” “newname.vmx”
  9. Edit the copied configuration file, such as (newname.vmx), using the vi editor:vi “newname.vmx”Note: For VMware ESX hosts, the nano editor is also available. If you are uncomfortable using the vi editor, seek assistance from a Linux/Unix administrator or file a Support Request and contact VMware Technical Support.
  10. Within the configuration file, modify all old instances of the virtual machine’s file names to the new file names. There should be at least the following to adjust:nvram = “originalname.nvram”
    displayName = “originalname”
    extendedConfigFile = “originalname.vmxf”
    scsi0:0.fileName = “originalname.vmdk”
    […]
    migrate.hostlog = “./originalname-UUID.hlog”

    Repeat this process for each virtual machine disk. Such as:

    scsi0:1.fileName = “originalname_1.vmdk”
    scsi0:2.fileName = “originalname_2.vmdk”

    Correct the VMkernel swap file reference:

    sched.swap.derivedName = “/vmfs/volumes/DatastoreUUID/originalname/originalname-UUID.vswp

    To

    sched.swap.derivedName = “/vmfs/volumes/DatastoreUUID/newname/newname-UUID.vswp

    Note: Be sure to rename both the .vswp file and the directory name for the swap file, bolded above.

  11. Correct any other remaining lines referencing the original path or file names.
  12. Save the file and exit the editor.
  13. Rename all the remaining files, except for the .vmx configuration file, to the new names desired. For example:mv “originalname.nvram” “newname.nvram”
  14. Change directory to the parent directory using cd .. and rename the directory for the virtual machine:mv “originalname” “newname”
  15. Using the VMware vSphere Client, browse the datastore and navigate to the renamed virtual machine directory.
  16. Right-click on the virtual machine’s configuration file (.vmx) and choose Add to inventory.Alternatively, you can use this command to inventory the virtual machine:vmware-cmd -s register “/vmfs/volues/DatastoreName/newname/newname.vmx”
  17. Power on the virtual machine.
  18. A question for the virtual machine displays in the Summary tab during power-on. Review the question by:
    • Clicking the Summary tab
    • Right-clicking the virtual machine in your inventory and selecting Answer question.When prompted, select I moved it, then click OK.Warning: Selecting I Copied It results in a change of the virtual machine’s UUID and MAC address, which may have detrimental effects on guest applications that are sensitive towards MAC address changes, and virtual machine backups that rely on UUIDs.

Additional Information

The command-line interpreter on ESX is case-sensitive and requires escaping of special characters used in some virtual machine file names. The above examples encourage the use of quotation marks around command arguments to ensure spaces and special characters are interpreted literally and do not require escape sequences.

For example, a virtual machine named “Original VM” is referenced either as:
“Original VM” with quotation marks, or Original\ VM.

Special characters such as opening and closing parentheses also require character escaping. For a virtual machine named “Original VM (1)”:
“Original VM (1)” with quotation marks, or Original\ VM\ \(1\).

The former quotation method simplifies the process considerably and improves readability.

Additional information on escape characters can be found in the Bash Reference Manual.

Upgrade paths for ESX/ESXi hosts

Purpose

There are several methods to upgrade ESX/ESXi. This article outlines the available upgrade paths.   Note: This is not a comprehensive guide on how to upgrade ESX/ESXi. For more information on performing an upgrade, see the links in this article.

Resolution

This table lists the methods available to upgrade your ESX/ESXi host, and identifies the version to which you can upgrade:

ESX/ESXi version that is currently installed Version that it can be upgraded to CD-ROM Installation Wizard *1 Using esxupdate from the Service Console *2 vSphere Remote CLI *3 Host Update Utility or Infrastructure Update *4 Update Manager *5 Offline Upgrade from Service Console *6
ESX 2.x ESX 3.0.x x x
ESX 3.0.x ESX 3.0.3, 3.0.3 U1, 3.5, 3.5 U1 – U5 x x
ESX 3.0.2 ESX 4.0 x x
ESX 3.0.3 ESX 3.5, 3.5 U1 – U5 x x x
ESX 3.0.3 ESX 4.0 x x x
ESX 3.5 ESX 3.5 U1 – U5 x x x x
ESX 3.5 ESX 4.1 x x
ESXi 3.5 ESXi 3.5 U1 – U5 x x x
ESX 3.5 ESX 4.0 x x x
ESXi 3.5 ESXi 4.0 x x
ESXi 3.5 ESXi 4.1 x
ESX 4.0 ESX 4.0 U1 – U2 x x x
ESX 4.0 ESX 4.1 x x x x
ESXi 4.0 ESXi 4.0 U1 – U2 x x x
ESXi 4.0 ESXi 4.1 x x

For more information about upgrading using:

Note: The Host Update Utility replaced Infrastructure Update and is available when you install the vSphere Client. It is a tool for upgrading ESX/ESXi hosts from 3.x to 4.0.x and for patching ESXi hosts only.  Patching ESX with this utility is not supported.  Also, as of vSphere 4.1 the Host Update Utility has been discontinued.

HP MSA2324SA Firmware update loop

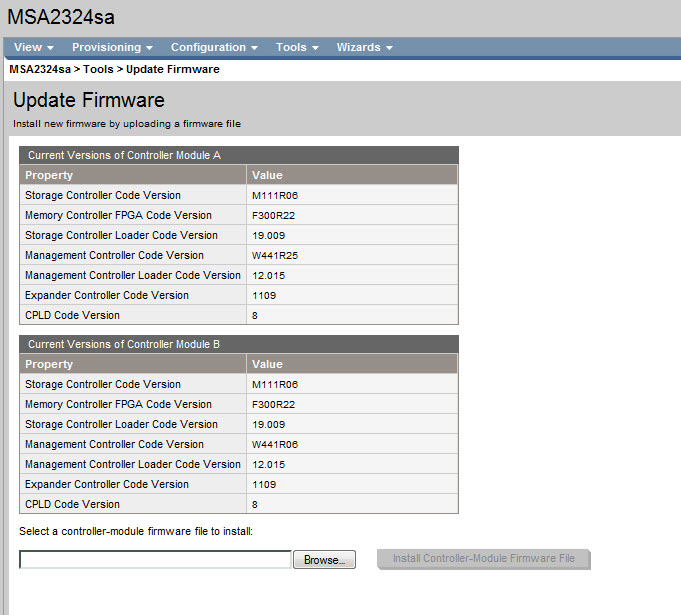
This week I was working on a project with an HP MSA 2324 SA storage box. After unboxing it and checking the software I discovered that the Firmware was a bit old, so I checked the HP site for updates and yes there was a newer version for it. I downloaded the new firmware and I installed the firmware with the HP Storage Management Utility. Controller Module A is flashed correctly. The Controller Module A starts updating Controller Module B, this is an automated process. After a couple of minutes the firmware update was complete, see screen shot. 

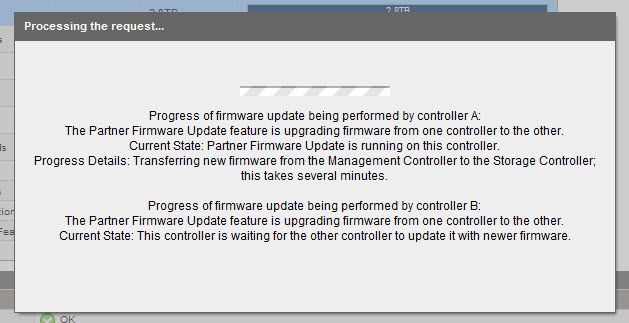
At first sight it looks good, but suddenly my explorer shows the following screen.

And this loops, Controller Module A sees that Controller Module B has an older Management Controller Code version. That’s why Controller Module A starts the update process for Controller Module B. The Flash process on Controller Module B goes bad so it looks.

How to resolve this problem?

Continue reading

Exchange 2010 SP1 FAQ and Known Issues

The Exchange Team Blog have posted a great article with lots of information about the installation of Service Pack 1 for Exchange 2010. Read the article at: http://msexchangeteam.com/archive/2010/09/01/456094.aspx

Last week we released Exchange Server 2010 Service Pack 1. It has received some great feedback and reviews from customers, experts, analysts, and the Exchange community.

The starting point for SP1 setup/upgrade should be the What’s New in SP1, SP1 Release Notes, and Prerequisites docs. As with any new release, there are some frequently asked deployment questions, and known issues, or issues reported by some customers. You may not face these in your environment, but we’re posting these here along with some workarounds so you’re aware of them as you test and deploy SP1.

  1. Upgrade order

    The order of upgrade from Exchange 2010 RTM to SP1 hasn’t changed from what was done in Exchange 2007. Upgrade server roles in the following order:

    1. Client Access server
    2. Hub Transport server
    3. Unified Messaging server
    4. Mailbox server

    The Edge Transport server role can be upgraded at any time; however, we recommend upgrading Edge Transport either before all other server roles have been upgraded or after all other server roles have been upgraded. For more details, see Upgrade from Exchange 2010 RTM to Exchange 2010 SP1 in the documenation.

  2. SP1 Prerequisites

    SP1 requires the installation of 4-5 hotfixes, depending on the operating system – Windows Server 2008, or Windows Server 2008 R2. To install the Exchange 2010 SP1 administration tools on Windows 7 and Windows Vista, you requires 2 hotfixes.

    Note: Due to the shared code base for these updates, Windows Server 2008 and Windows Vista share the same updates. Similarly, Windows Server 2008 R2 and Windows 7 share the same updates. Make sure you select the x64 versions of each update to be installed on your Exchange 2010 servers.

    Here’s a matrix of the updates required, including download locations and file names.

    Hotfix Download Windows Server 2008 Windows Server 2008 R2 Windows 7 & Windows Vista
    979744
    A .NET Framework 2.0-based Multi-AppDomain application stops responding when you run the application
    MSDN
    or Microsoft Connect
    Windows6.0-KB979744-x64.msu (CBS: Vista/Win2K8) Windows6.1-KB979744-x64.msu (CBS: Win7/Win2K8 R2) N. A.
    983440
    An ASP.NET 2.0 hotfix rollup package is available for Windows 7 and for Windows Server 2008 R2
    Request from CSS (select the x64 version) Yes Yes N.A.
    977624
    AD RMS clients do not authenticate federated identity providers in Windows Server 2008 or in Windows Vista. Without this update, Active Directory Rights Management Services (AD RMS) features may stop working
    Request from CSS using the “View and request hotfix downloads” link in the KBA | US-English Select the download for Windows Vista for the x64 platform. N.A. N.A.
    979917
    Two issues occur when you deploy an ASP.NET 2.0-based application on a server that is running IIS 7.0 or IIS 7.5 in Integrated mode
    Request from CSS using the Hotfix Request Web Submission Form or by phone (no charge) Yes N. A. N. A.
    973136,
    FIX: ArgumentNullException exception error message when a .NET Framework 2.0 SP2-based application tries to process a response with zero-length content to an asynchronous ASP.NET Web service request: “Value cannot be null”.
    Connect Windows6.0-KB973136-x64.msu N.A. N. A.
    977592
    RPC over HTTP clients cannot connect to the Windows Server 2008 RPC over HTTP servers that have RPC load balancing enabled.
    Request from CSS Select the download for Windows Vista (x64) N.A. N. A.
    979099
    An update is available to remove the application manifest expiry feature from AD RMS clients.
    Download Center N. A. Windows6.1-KB979099-x64.msu N. A.
    982867

    WCF services that are hosted by computers together with a NLB fail in .NET Framework 3.5 SP1

    MSDN N. A. Windows6.1-KB982867-v2-x64.msu (Win7) X86: Windows6.1-KB982867-v2-x86.msu (Win7)
    x64: Windows6.1-KB982867-v2-x64.msu (Win7)
    977020
    FIX: An application that is based on the Microsoft .NET Framework 2.0 Service Pack 2 and that invokes a Web service call asynchronously throws an exception on a computer that is running Windows 7.
    Microsoft Connect N. A. N. A. x64: Windows6.1-KB977020-v2-x64.msu

    X86: Windows6.1-KB977020-v2-x86.msu

    Some of the hotfixes would have been rolled up in a Windows update or service pack. Given that the Exchange team released SP1 earlier than what was planned and announced earlier, it did not align with some of the work with the Windows platform. As a result, some hotfixes are available from MSDN/Connect, and some require that you request them online using the links in the corresponding KBAs. The administrator experience when initially downloading these hotfixes may be a little odd. However, once you download the hotfixes, and receive two of the hotfixes from CSS, you can use the same for subsequent installs on other servers. In due course, all these updates may become available on the Download Center, and also through Windows Update.

    These hotfixes have been tested extensively as part of Exchange 2010 SP1 deployments within Microsoft and by our TAP customers. They are fully supported by Microsoft.

  3. Prerequisite download pages linked from SP1 Setup are unavailable

    When installing Exchange Server 2010 SP1 the prereq check may turn up some required hotfixes to install. The message will include a link to click for help. Clicking this link redirects you to a page saying that the content does not exist.

    We’re working to update the linked content.

    Meanwhile, please refer to the TechNet article Exchange 2010 Prerequisites to download and install the prerequisites required for your server version (the hotfixes are linked to in the above table, but you’ll still need to install the usual prerequisites such as .Net Framework 3.5 SP1, Windows Remote Management (WinRM) 2.0, and the required OS components).

  4. The Missing Exchange Management Shell Shortcut

    Some customers have reported that after upgrading an Exchange Server 2010 server to Exchange 2010 SP1, the Exchange Management Shell shortcut is missing from program options. Additionally, the .ps1 script files associated with the EMS may also be missing.

    We’re actively investigating this issue. Meanwhile, here’s a workaround:

    1. Verify that the ConnectFunctions.ps1, commonconnectfunctions.ps1 and RemoteExchange.ps1 files are present in the %ExchangeInstallPath%\bin directory.NOTE: If these files are missing, you can copy the files from the Exchange Server 2010 Service Pack 1 installation media to the %ExchangeInstallPath%\bin directory. These files are present in the \setup\serverroles\common folder.
    2. Click Start -> AdmiinistrativeTools ->, right-click Windows PowerShell Modules, select Send to -> Desktop (as shortcut)
    3. Go to the Properties of the shortcut and on Target replace the path to C:\WINDOWS\system32\WindowsPowerShell\v1.0\powershell.exe -noexit -command “. ‘C:\Program Files\Exchange Server\V14\bin\RemoteExchange.ps1’; Connect-ExchangeServer -auto”Note: if the Exchange installation folder or drive name is different than the default, you need to change the path accordingly.
  5. Upgrading Edge Transport on Forefront Threat Management Gateway (TMG) and Forefront Protection for Exchange 2010

    If you upgrade a server with the Edge Transport server role running with ForeFront Threat Management Gateway (TMG) and ForeFront Protection for Exchange (FPE) enabled for SMTP protection, the ForeFront TMG Managed Control Service may fail to start and E-mail policy configuration settings cannot be applied.

    The TMG team is working on this issue. See Problems when installing Exchange 2010 Service Pack 1 on a TMG configured for Mail protection on the ForeFront TMG (ISA) Team Blog. Exchange 2010 SP1 Release Notes has been updated with the above information.

  6. Static Address Book Service Port Configuration Changes

    The location for setting the port the address book service should use has changed in SP1. In Exchange 2010 RTM you had to edit the Microsoft.exchange.addressbook.service.exe.config to configure the service port. In SP1 you must use the following registry key:
    Path: HKEY_LOCAL_MACHINE\SYSTEM\CurrentControlSet\services\MSExchangeAB\Parameters
    Value name: RpcTcpPort
    Type: REG_SZ (String)
    When you apply SP1 to a machine where you had previously configured a static port by editing the Microsoft.exchange.addressbook.service.exe.config file, the upgrade process will not carry forward your static port assignments. Following a restart, the Address Book Service will revert to using a dynamic port instead of a static port specified in the config file. This may cause interruptions in service.

    As with all upgrades where servers are in load balanced pools, we recommend you perform a rolling upgrade — removing servers from the pool, updating them and then moving the pool to the newly upgraded machines. Alternatively, we recommend that you upgrade an array of servers by draining connections from any one machine before you upgrade it.

    There are times when these approaches may not be possible. You can maintain your static port configuration, and have it take effect the moment the address book service starts for the first time following the application of the service pack, by creating the registry key BEFORE you apply SP1 to your server. The registry key has no impact pre SP1, and so by configuring it before you apply the Service Pack you can avoid the need to make changes to set the port post install, and avoid any service interruptions.

  7. iPhone, OWA Premium and POP3 & IMAP4 issues due to invalid accepted domain

    After applying E2010 SP1:

    1. iPhone users may not be able to view the content of incoming messages in their Inboxes, and when they try to open a message, they get an error saying:This message has not been downloaded from the server.Admins may see the following event logged in the Application Event Log on Exchange 2010 CAS Server:Watson report about to be sent for process id: 1234, with parameters: E12, c-RTL-AMD64, 14.01.0218.011, AirSync, MSExchange ActiveSync, Microsoft.Exchange.Data.Storage.InboundConversionOptions.CheckImceaDomain, UnexpectedCondition:ArgumentException, 4321, 14.01.0218.015.
    2. OWA Premium users may not be able to reply or forward a message. They may see the following error in OWA:An unexpected error occurred and your request couldn’t be handled. Exception type: System.ArgumentException, Exception message: imceaDomain must be a valid domain name.
    3. POP3 & IMAP4 users may also not be able to retrieve incoming mail and Admins will see the following event logged in Event Log:ERR Server Unavailable. 21; RpcC=6; Excpt=imceaDomain must be a valid domain name.

    Resolution

    Please run the following command under Exchange Management Shell and verify that there is one domain marked as ‘Default’ and it’s DomainName & Name values are valid domain names. We were able to reproduce the issue by setting a domain name with a space in it, like “aa bb”

    Get-AcceptedDomain | fl

    If you also have an invalid domain name there (for example, a domain name with a space in it), then removing the space and restarting the server will fix the EAS (iPhone), OWA, POP3 & IMAP4 issues as mentioned above.

    Command to run under EMS would be:

    Set-AcceptedDomain –Identity <value> -Name “ValidSMTPDomainName”

    Thes examples update the Name parameter of the “My Company” and “ABC Local” accepted domains (the space is removed from both):

    Set-AcceptedDomain –Identity “My Company” –Name “MyCompany.Com”
    Set-AcceptedDomain –Identity “ABC Local” –Name “ABC.Local”

  8. Error when adding or removing a mailbox database copy

    If a server running Exchange 2010 RTM (or Exchange 2010 SP1 Beta) is upgraded to Exchange 2010 SP1, administrators may experience an error when using the Add-MailboxdDtabaseDopy or Remove-MailboxDatabaseCopy cmdlets to add or remove DAG members.

    When you try to add a DAG member, you may see the following error:

    Add-MailboxDatabaseCopy DAG-DB0 -MailboxServer DAG-2

    The result:

    WARNING: An unexpected error has occurred and a Watson dump is being generated: Registry key has subkeys and recursive removes are not supported by this method.
    Registry key has subkeys and recursive removes are not supported by this method.
    + CategoryInfo : NotSpecified: (:) [Add-MailboxDatabaseCopy], InvalidOperationException
    + FullyQualifiedErrorId : System.InvalidOperationException,Microsoft.Exchange.Management.SystemConfigurationTasks.
    AddMailboxDatabaseCopy

    The command is not successful in adding the copy or updating Active Directory to show the copy was added. This happens due to presence of the DumpsterInfo registry key.

    Workaround: Delete the DumpsterInfo key, as shown below.

    1. Identify the GUID of the database that is being added using this command:Get-MailboxDatabase DAG-DB0 | fl name,GUIDThe result:Name : DAG-DB0
      Guid : 8d3a9778-851c-40a4-91af-65a2c487b4cc
    2. On the server specified in the add command, using the database GUID identified, remove the following registry key:
      HKEY_LOCAL_MACHINE\SOFTWARE\Microsoft\ExchangeServer\v14\Replay\State\<DB-GUID>\DumpsterInfoThe GUID identified in this case is 8d3a9778-851c-40a4-91af-65a2c487b4cc. With this information you can now export and delete the DumpsterInfo key on the server where you are attempting to add the mailbox database copy. This can be easily done using the registry editor, but if you have more than a handful of DAG members, this is best automated using the Shell.This example removes the DumpsterInfo key from the 8d3a9778-851c-40a4-91af-65a2c487b4cc key:

      Remove-Item HKLM:\Software\Microsoft\ExchangeServer\Replay\State\8d3a9778-851c-40a4-91af-65a2c487b4cc\DumpsterInfo

      To automate this across all servers in your organization, use the DeleteDumpsterRegKey.ps1 script.

      File: deletedumpsterregkey_ps1.txt
      Description: The DeleteDumpsterRegkey.ps1 script can be used to delete the offending DumpsterInfo registry keys that can cause this problem on all mailbox servers in the organization. Rename the file to DeleteDumpsterRegkey.ps1 (remove the .txt extension).

      For more info, see Tim McMichael’s blog post Exchange 2010 SP1: Error when adding or removing a mailbox database copy.

Thanks to all the folks in CSS and Exchange teams who helped identify, validate and provide workarounds for some of the issues mentioned above, and to the Exchange community and MVPs for their feedback.

Microsoft Exchange 2010 Service Pack 1 released

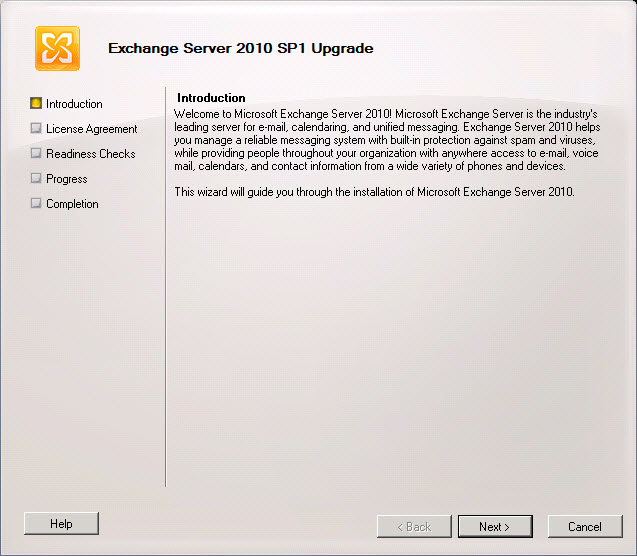
Today Microsoft released Service Pack 1 for Microsoft Exchange 2010. The Exchange team released this news on there blog called You Had Me At EHLO. See : http://msexchangeteam.com/archive/2010/08/25/455861.aspx
New Deployment Functionality

During an Exchange 2010 SP1 installation, you can now select a new option to install the required Windows roles and features for each selected Exchange 2010 SP1 server role. For more information, see New Deployment Functionality in Exchange 2010 SP1.

Exchange ActiveSync

In Exchange 2010 SP1, you can manage Exchange ActiveSync devices using the Exchange Control Panel (ECP). Administrators can perform the following tasks:

  • Manage the default access level for all mobile phones and devices.
  • Set up e-mail alerts when a mobile phone or device is quarantined.
  • Personalize the message that users receive when their mobile phone or device is either recognized or quarantined.
  • Provide a list of quarantined mobile phones or devices.
  • Create and manage Exchange ActiveSync device access rules.
  • Allow or block a specific mobile phone or device for a specific user.

For every user, the administrator can perform the following tasks from the user’s property pages:

  • List the mobile phones or devices for a specific user.
  • Initiate remote wipes on mobile phones or devices.
  • Remove old mobile phone or device partnerships.
  • Create a rule for all users of a specific mobile phone or device or mobile phone type.
  • Allow or block a specific mobile phone or device for the specific user.

SMS Sync

SMS Sync is a new feature in Exchange ActiveSync that works with Windows Mobile 6.1 with the Outlook Mobile Update and with Windows Mobile 6.5. SMS Sync is the ability to synchronize messages between a mobile phone or device and an Exchange 2010 Inbox. When synchronizing a Windows Mobile phone with an Exchange 2010 mailbox, users can choose to synchronize their text messages in addition to their Inbox, Calendar, Contacts, Tasks, and Notes. When synchronizing text messages, users will be able to send and receive text messages from their Inbox. This feature is dependent on the user’s mobile phones or devices supporting this feature

Reset Virtual Directory

In Exchange 2010 SP1, you can use the new Reset Client Access Virtual Directory wizard to reset one or more Client Access server virtual directories. The new wizard makes it easier to reset a Client Access server virtual directory. One reason that you might want to reset a Client Access server virtual directory is to resolve an issue related to a damaged file on a virtual directory. In addition to resetting virtual directories, the wizard creates a log file that includes the settings for each virtual directory that you choose to reset. For more information, see Reset Client Access Virtual Directories.

Exchange Store and Mailbox Database Functionality

The following is a list of new store and mailbox database functionality in Exchange 2010 SP1:

  • With the New-MailboxRepairRequest cmdlet, you can detect and repair mailbox and database corruption issues.
  • Store limits were increased for administrative access.
  • The Database Log Growth Troubleshooter (Troubleshoot-DatabaseSpace.ps1) is a new script that allows you to control excessive log growth of mailbox databases.
  • Public Folders client permissions support was added to the Exchange Management Console (EMC).

Mailbox and Recipients Functionality

The following is a list of new mailbox and recipient functionality included in Exchange 2010 SP1:

  • Calendar Repair Assistant supports more scenarios than were available in Exchange 2010 RTM.
  • Mailbox Assistants are now all throttle-based (changed from time-based in Exchange 2010 RTM).
  • Internet calendar publishing allows users in your Exchange organization to share their Outlook calendars with a broad Internet audience.
  • Importing and exporting .pst files now uses the Mailbox Replication service and doesn’t require Outlook.
  • Hierarchical address book support allows you to create and configure your address lists and offline address books in a hierarchical view.
  • Distribution group naming policies allow you to configure string text that will be appended or prepended to a distribution group’s name when it’s created.
  • Soft-delete of mailboxes after move completion

High Availability and Site Resilience Functionality

The following is a list of new high availability and site resilience functionality included in Exchange 2010 SP1:

  • Continuous replication – block mode
  • Active mailbox database redistribution
  • Enhanced datacenter activation coordination mode support
  • New and enhanced management and monitoring scripts
  • Exchange Management Console user interface enhancements
  • Improvements in failover performance

Messaging Policy and Compliance Functionality

The following is a list of new messaging policy and compliance functionality included in Exchange 2010 SP1:

  • Provision personal archive on a different mailbox database
  • Import historical mailbox data to personal archive
  • Delegate access to personal archive
  • New retention policy user interface
  • Support for creating retention policy tags for Calendar and Tasks default folders
  • Opt-in personal tags
  • Multi-Mailbox Search preview
  • Annotations in Multi-Mailbox Search
  • Multi-Mailbox Search data de-duplication
  • WebReady Document Viewing of IRM-protected messages in Outlook Web App
  • IRM in Exchange ActiveSync for protocol-level IRM
  • IRM logging
  • Mailbox audit logging

Technet Exchange 2010 SP1 info
Release Notes for Exchange Server 2010 SP1
What’s New in Exchange 2010 SP1
Downloads:
Microsoft Exchange Server 2010 Service Pack 1
Microsoft Exchange Server 2010 SP1 Language Pack Bundle
Exchange Server 2010 SP1 UM Language Packs
Exchange Server 2010 SP1 Help
VMware vSphere 4.1 Released

Today VMware released a new version of their virtualization product VMware vSphere 4.1. There are a lot of new things and features in this product. Eric Siebert has created a good article with all the new stuff that comes with this release. You can find the original article here: http://vsphere-land.com/news/vsphere-41-the-links.html

Downloads.

Continue reading

Migrate Small Business Server 2003 to Exchange 2010 and Windows 2008 R2

For a project I was looking for a document about migrating from Windows 2003 Small Business to Windows 2008 R2 and Exchange 2010. I’ve found a great article written by demazter, this article describes every step. Original link: http://www.experts-exchange.com/Software/Server_Software/Email_Servers/Exchange/A_2881-Migrate-Small-Business-Server-2003-to-Exchange-2010-and-Windows-2008-R2.html

This guide is intended to provide step by step instructions on how to migrate from Small Business Server 2003 to Windows 2008 R2 with Exchange 2010.

For this migration to work you will need the following software:

  • Windows Small Business Server 2003 (SBS 2003)
  • Windows 2008 Server or Windows 2008 R2 Server
  • Exchange Server 2010

Steps required:

  • 1.   Health Checks on Small Business Server 2003
  • 2.   Join new Windows 2008 Server to the domain as a member server
  • 3.   Prepare Active Directory for Windows 2008 R2 Server
  • 4.   Make Windows 2008 R2 Server a Domain Controller of the Existing Small Business Server 2003 Domain
  • 5.   Transfer DHCP Service
  • 6.   Install Exchange 2010
  • 7.   Installing Exchange 2010 SSL Certificate
  • 8.   Migrate Exchange Data
  • 9.   Migrate SharePoint Services
  • 10.  Migrate shared user data
  • 11. Uninstall Exchange 2003 from Small Business Server 2003
  • 12. Transfer all 5 FSMO roles to Windows 2008 Domain Controller
  • 13. DCPROMO SBS 2003 server so it is no longer a domain controller and remove from network

It’s important that the steps are followed in order as different stages make different changes to the way in which your server operates.  For example you MUST make the 2008 server a domain controller before you install Exchange.

Continue reading