Knowledge
- Identify appropriate BIOS and firmware setting requirements for optimal ESXi host performance
- Identify appropriate driver revisions required for optimal ESXi host performance
Skills and Abilities
- Tune ESXi host memory configuration
- Tune ESXi host networking configuration
- Tune ESXi host CPU configuration
- Tune ESXi host storage configuration
- Configure and apply advanced ESXi host attributes
- Configure and apply advanced Virtual Machine attributes
-
Configure advanced cluster attributes
Tune ESXi host memory configuration
Official Documentation:
vSphere Resource Management Guide, Chapter 5, Memory Virtualization Basics, Page 25 and also Chapter 6, Administering Memory Resources, Page 29
vSphere Monitoring and Performance Guide, Chapter 1, Monitoring Inventory Objects with Performance Charts, Section “Solutions for memory Performance Problems”, Page 19. This section contains some information on troubleshooting memory issues
Performance Best Practices for VMware vSphere 5.0, Chapter 2 ESXi and Virtual Machines, Section ESXi Memory Considerations, page 25
Before you manage memory resources, you should understand how they are being virtualized and used by ESXi.
The VMkernel manages all machine memory. The VMkernel dedicates part of this managed machine memory for its own use. The rest is available for use by virtual machines. Virtual machines use machine memory for two purposes: each virtual machine requires its own memory and the virtual machine monitor (VMM) requires some memory and a dynamic overhead memory for its code and data.
The virtual and physical memory space is divided into blocks called pages. When physical memory is full, the data for virtual pages that are not present in physical memory are stored on disk. Depending on processor architecture, pages are typically 4 KB or 2 MB. See “Advanced Memory Attributes,” on page 100.
Virtual Machine Memory
Each virtual machine consumes memory based on its configured size, plus additional overhead memory for virtualization.
The configured size is a construct maintained by the virtualization layer for the virtual machine. It is the amount of memory that is presented to the guest operating system, but it is independent of the amount of physical
RAM that is allocated to the virtual machine, which depends on the resource settings (shares, reservation, limit) explained below.
For example, consider a virtual machine with a configured size of 1GB. When the guest operating system boots, it detects that it is running on a dedicated machine with 1GB of physical memory. The actual amount of physical host memory allocated to the virtual machine depends on its memory resource settings and memory contention on the ESXi host. In some cases, the virtual machine might be allocated the full 1GB. In other cases, it might receive a smaller allocation. Regardless of the actual allocation, the guest operating system continues to behave as though it is running on a dedicated machine with 1GB of physical memory.
| Shares | Specify the relative priority for a virtual machine if more than the reservationis available. |
| Reservation | Is a guaranteed lower bound on the amount of physical memory that the hostreserves for the virtual machine, even when memory is overcommitted. Set thereservation to a level that ensures the virtual machine has sufficient memory
to run efficiently, without excessive paging. After a virtual machine has accessed its full reservation, it is allowed to retain that amount of memory and this memory is not reclaimed, even if the virtual machine becomes idle. For example, some guest operating systems (for example, Linux) might not access all of the configured memory immediately after booting. Until the virtual machines accesses its full reservation, VMkernel can allocate any unused portion of its reservation to other virtual machines. However, after the guest’s workload increases and it consumes its full reservation, it is allowed to keep this memory. |
| Limit | Is an upper bound on the amount of physical memory that the host can allocateto the virtual machine. The virtual machine’s memory allocation is alsoimplicitly limited by its configured size.
Overhead memory includes space reserved for the virtual machine frame buffer and various virtualization data structures. |
Memory Overcommitment
For each running virtual machine, the system reserves physical memory for the virtual machine’s reservation (if any) and for its virtualization overhead.
Because of the memory management techniques the ESXi host uses, your virtual machines can use more memory than the physical machine (the host) has available. For example, you can have a host with 2GB memory and run four virtual machines with 1GB memory each. In that case, the memory is overcommitted.
Overcommitment makes sense because, typically, some virtual machines are lightly loaded while others are more heavily loaded, and relative activity levels vary over time.
To improve memory utilization, the ESXi host transfers memory from idle virtual machines to virtual machines that need more memory. Use the Reservation or Shares parameter to preferentially allocate memory to important virtual machines. This memory remains available to other virtual machines if it is not in use.
In addition, memory compression is enabled by default on ESXi hosts to improve virtual machine performance when memory is overcommitted as described in “Memory Compression,” on page 36.
Memory Sharing
Many workloads present opportunities for sharing memory across virtual machines.
For example, several virtual machines might be running instances of the same guest operating system, have the same applications or components loaded, or contain common data. ESXi systems use a proprietary pagesharing technique to securely eliminate redundant copies of memory pages.
With memory sharing, a workload consisting of multiple virtual machines often consumes less memory than it would when running on physical machines. As a result, the system can efficiently support higher levels of overcommitment.
The amount of memory saved by memory sharing depends on workload characteristics. A workload of many nearly identical virtual machines might free up more than thirty percent of memory, while a more diverse workload might result in savings of less than five percent of memory.
Software-Based Memory Virtualization
ESXi virtualizes guest physical memory by adding an extra level of address translation.
- The VMM for each virtual machine maintains a mapping from the guest operating system’s physical memory pages to the physical memory pages on the underlying machine. (VMware refers to the underlying host physical pages as “machine” pages and the guest operating system’s physical pages as “physical” pages.)
Each virtual machine sees a contiguous, zero-based, addressable physical memory space. The underlying machine memory on the server used by each virtual machine is not necessarily contiguous.
- The VMM intercepts virtual machine instructions that manipulate guest operating system memory management structures so that the actual memory management unit (MMU) on the processor is not updated directly by the virtual machine.
- The ESXi host maintains the virtual-to-machine page mappings in a shadow page table that is kept up to date with the physical-to-machine mappings (maintained by the VMM).
- The shadow page tables are used directly by the processor’s paging hardware.
This approach to address translation allows normal memory accesses in the virtual machine to execute without adding address translation overhead, after the shadow page tables are set up. Because the translation lookaside buffer (TLB) on the processor caches direct virtual-to-machine mappings read from the shadow page tables, no additional overhead is added by the VMM to access the memory.
Performance Considerations
The use of two-page tables has these performance implications.
- No overhead is incurred for regular guest memory accesses.
-
Additional time is required to map memory within a virtual machine, which might mean:
- The virtual machine operating system is setting up or updating virtual address to physical address mappings.
- The virtual machine operating system is switching from one address space to another (context switch).
- The virtual machine operating system is setting up or updating virtual address to physical address mappings.
- Like CPU virtualization, memory virtualization overhead depends on workload.
Hardware-Assisted Memory Virtualization
Some CPUs, such as AMD SVM-V and the Intel Xeon 5500 series, provide hardware support for memory virtualization by using two layers of page tables.
The first layer of page tables stores guest virtual-to-physical translations, while the second layer of page tables stores guest physical-to-machine translation. The TLB (translation look-aside buffer) is a cache of translations maintained by the processor’s memory management unit (MMU) hardware. A TLB miss is a miss in this cache and the hardware needs to go to memory (possibly many times) to find the required translation. For a TLB miss to a certain guest virtual address, the hardware looks at both page tables to translate guest virtual address to host physical address.
The diagram illustrates the ESXi implementation of memory virtualization.
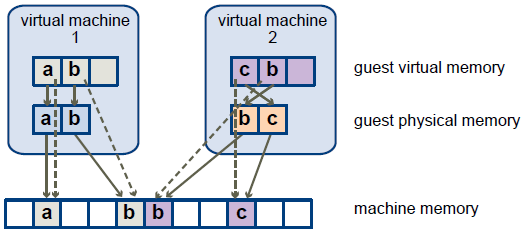
- The boxes represent pages, and the arrows show the different memory mappings.
- The arrows from guest virtual memory to guest physical memory show the mapping maintained by the page tables in the guest operating system. (The mapping from virtual memory to linear memory for x86-architecture processors is not shown.)
- The arrows from guest physical memory to machine memory show the mapping maintained by the VMM.
- The dashed arrows show the mapping from guest virtual memory to machine memory in the shadow page tables also maintained by the VMM. The underlying processor running the virtual machine uses the shadow page table mappings.
Because of the extra level of memory mapping introduced by virtualization, ESXi can effectively manage memory across all virtual machines. Some of the physical memory of a virtual machine might be mapped to shared pages or to pages that are unmapped, or swapped out.
A host performs virtual memory management without the knowledge of the guest operating system and without interfering with the guest operating system’s own memory management subsystem.
Performance Considerations
When you use hardware assistance, you eliminate the overhead for software memory virtualization. In particular, hardware assistance eliminates the overhead required to keep shadow page tables in synchronization with guest page tables. However, the TLB miss latency when using hardware assistance is significantly higher. As a result, whether or not a workload benefits by using hardware assistance primarily depends on the overhead the memory virtualization causes when using software memory virtualization. If a workload involves a small amount of page table activity (such as process creation, mapping the memory, or context switches), software virtualization does not cause significant overhead. Conversely, workloads with a large amount of page table activity are likely to benefit from hardware assistance.
Solutions for Memory Performance Problems
Host machine memory is the hardware backing for guest virtual memory and guest physical memory. Host machine memory must be at least slightly larger than the combined active memory of the virtual machines on the host. A virtual machine’s memory size must be slightly larger than the average guest memory usage.
Increasing the virtual machine memory size results in more overhead memory usage.
Problem
- Memory usage is constantly high (94% or greater) or constantly low (24% or less).
- Free memory consistently is 6% or less and swapping frequently occurs.
Cause
- The host probably is lacking the memory required to meet the demand. The active memory size is the same as the granted memory size, which results in memory resources that are not sufficient for the workload. Granted memory is too much if the active memory is constantly low.
- Host machine memory resources are not enough to meet the demand, which leads to memory reclamation and degraded performance.
- The active memory size is the same as the granted memory size, which results in memory resources that are not sufficient for the workload.
Solution
- Verify that VMware Tools is installed on each virtual machine. The balloon driver is installed with Vmware Tools and is critical to performance.
- Verify that the balloon driver is enabled. The VMkernel regularly reclaims unused virtual machine memory by ballooning and swapping. Generally, this does not impact virtual machine performance.
- Reduce the memory space on the virtual machine, and correct the cache size if it is too large. This frees up memory for other virtual machines.
- If the memory reservation of the virtual machine is set to a value much higher than its active memory, decrease the reservation setting so that the VMkernel can reclaim the idle memory for other virtual machines on the host.
- Migrate one or more virtual machines to a host in a DRS cluster.
- Add physical memory to the host.
More information
Performance Best Practices for VMware vSphere 5.0, Chapter 2 ESXi and Virtual Machines, Section ESXi Memory Considerations, page 25
Tune ESXi host networking configuration
Official Documentation:
vSphere Networking Guide, read Chapter 8, Networking Best Practices.
vSphere Monitoring and Performance Guide, Chapter 1, Monitoring Inventory Objects with Performance Charts, Section “Solutions for poor Network Performance “, Page 21. This section contains some information on troubleshooting network performances issues
Performance Best Practices for VMware vSphere 5.0, Chapter 2 ESXi and Virtual Machines, Section ESXi Networking Considerations, page 34
General ESXi Networking Considerations
- In a native environment, CPU utilization plays a significant role in network throughput. To process higher levels of throughput, more CPU resources are needed. The effect of CPU resource availability on the network throughput of virtualized applications is even more significant. Because insufficient CPU resources will limit maximum throughput, it is important to monitor the CPU utilization of high-throughput workloads.
- Use separate virtual switches, each connected to its own physical network adapter, to avoid contention between the VMkernel and virtual machines, especially virtual machines running heavy networking workloads.
- To establish a network connection between two virtual machines that reside on the same ESXi system, connect both virtual machines to the same virtual switch. If the virtual machines are connected to different virtual switches, traffic will go through wire and incur unnecessary CPU and network overhead.
Network I/O Control (NetIOC)
Network I/O Control (NetIOC) allows the allocation of network bandwidth to network resource pools. You can either select from among seven predefined resource pools (Fault Tolerance traffic, iSCSI traffic, vMotion traffic, management traffic, vSphere Replication (VR) traffic, NFS traffic, and virtual machine traffic) or you can create user-defined resource pools. Each resource pool is associated with a portgroup and, optionally, assigned a specific 802.1p priority level.
Network bandwidth can be allocated to resource pools using either shares or limits:
- Shares can be used to allocate to a resource pool a proportion of a network link’s bandwidth equivalent to the ratio of its shares to the total shares. If a resource pool doesn’t use its full allocation, the unused bandwidth is available for use by other resource pools.
- Limits can be used to set a resource pool’s maximum bandwidth utilization (in Mbps) from a host through a specific virtual distributed switch (vDS). These limits are enforced even if a vDS is not saturated, potentially limiting a resource pool’s bandwidth while simultaneously leaving some bandwidth unused.
On the other hand, if a resource pool’s bandwidth utilization is less than its limit, the unused bandwidth is available to other resource pools.
NetIOC can guarantee bandwidth for specific needs and can prevent any one resource pool from impacting the others.
For further information about NetIOC, see VMware Network I/O Control: Architecture, Performance and Best Practices.
DirectPath I/O
vSphere DirectPath I/O leverages Intel VT-d and AMD-Vi hardware support (described in “Hardware-Assisted I/O MMU Virtualization (VT-d and AMD-Vi)” on page 10) to allow guest operating systems to directly access hardware devices. In the case of networking, DirectPath I/O allows the virtual machine to access a physical NIC directly rather than using an emulated device (E1000) or a para-virtualized device (VMXNET, VMXNET3). While DirectPath I/O provides limited increases in throughput, it reduces CPU cost for networking-intensive workloads.
DirectPath I/O is not compatible with certain core virtualization features, however. This list varies with the hardware on which ESXi is running:
- New for vSphere 5.0, when ESXi is running on certain configurations of the Cisco Unified Computing System (UCS) platform, DirectPath I/O for networking is compatible with vMotion, physical NIC sharing, snapshots, and suspend/resume. It is not compatible with Fault Tolerance, NetIOC, memory overcommit, VMCI, or VMSafe.
- For server hardware other than the Cisco UCS platform, DirectPath I/O is not compatible with vMotion, physical NIC sharing, snapshots, suspend/resume, Fault Tolerance, NetIOC, memory overcommit, or VMSafe.
Typical virtual machines and their workloads don’t require the use of DirectPath I/O. For workloads that are very networking intensive and don’t need the core virtualization features mentioned above, however, DirectPath I/O might be useful to reduce CPU usage.
SplitRx Mode
SplitRx mode, a new feature in ESXi 5.0, uses multiple physical CPUs to process network packets received in a single network queue. This feature can significantly improve network performance for certain workloads.
These workloads include:
- Multiple virtual machines on one ESXi host all receiving multicast traffic from the same source. (SplitRx mode will typically improve throughput and CPU efficiency for these workloads.)
- Traffic via the vNetwork Appliance (DVFilter) API between two virtual machines on the same ESXi host. (SplitRx mode will typically improve throughput and maximum packet rates for these workloads.)
This feature, which is supported only for VMXNET3 virtual network adapters, is individually configured for each virtual NIC using the ethernetX.emuRxMode variable in each virtual machine’s .vmx file (where X is replaced with the network adapter’s ID).
The possible values for this variable are:
- ethernetX.emuRxMode = “0”
This value disables splitRx mode for ethernetX.
- ethernetX.emuRxMode = “1”
This value enables splitRx mode for ethernetX.
To change this variable through the vSphere Client:
- Select the virtual machine you wish to change, then click Edit virtual machine settings.
- Under the Options tab, select General, then click Configuration Parameters.
- Look for ethernetX.emuRxMode (where X is the number of the desired NIC). If the variable isn’t present, click Add Row and enter it as a new variable.
- Click on the value to be changed and configure it as you wish.
The change will not take effect until the virtual machine has been restarted.
Running Network Latency Sensitive Applications
By default the ESXi network stack is configured to drive high network throughout at low CPU cost. While this default configuration provides better scalability and higher consolidation ratios, it comes at the cost of potentially higher network latency. Applications that are highly sensitive to network latency might therefore benefit from the following:
- Use VMXNET3 virtual network adapters (see “Guest Operating System Networking Considerations” on page 42).
-
Adjust the host power management settings:
Some of the power management features in newer server hardware can increase network latency. Disable them as follows:
- Set the ESXi host power policy to Maximum performance (as described in “Host Power Management in ESXi” on page 23; this is the preferred method) or disable power management in the BIOS (as described in “Power Management BIOS Settings” on page 14).
- Disable C1E and other C-states in BIOS (as described in “Power Management BIOS Settings” on page 14).
- Enable Turbo Boost in BIOS (as described in “General BIOS Settings” on page 14).
- Set the ESXi host power policy to Maximum performance (as described in “Host Power Management in ESXi” on page 23; this is the preferred method) or disable power management in the BIOS (as described in “Power Management BIOS Settings” on page 14).
-
Disable VMXNET3 virtual interrupt coalescing for the desired NIC.
In some cases this can improve performance for latency-sensitive applications. In other cases—most notably applications with high numbers of outstanding network requests—it can reduce performance.
To do this through the vSphere Client:
- Select the virtual machine you wish to change, then click Edit virtual machine settings.
- Under the Options tab, select General, then click Configuration Parameters.
- Look for ethernetX.coalescingScheme (where X is the number of the desired NIC). If the variable isn’t present, click Add Row and enter it as a new variable.
- Click on the value to be changed and set it to disabled.
The change will not take effect until the virtual machine has been restarted.
Solutions for Poor Network Performance
Network performance is dependent on application workload and network configuration. Dropped network packets indicate a bottleneck in the network. Slow network performance can be a sign of load-balancing problems.
Problem
Network problems can manifest in many ways:
- Packets are being dropped.
- Network latency is high.
- Data receive rate is low.
Cause
Network problems can have several causes:
- Virtual machine network resource shares are too few.
- Network packet size is too large, which results in high network latency. Use the VMware AppSpeed performance monitoring application or a third-party application to check network latency.
- Network packet size is too small, which increases the demand for the CPU resources needed for processing each packet. Host CPU, or possibly virtual machine CPU, resources are not enough to handle the load.
Solution
- Determine whether packets are being dropped by using esxtop or the advanced performance charts to examine the droppedTx and droppedRx network counter values. Verify that VMware Tools is installed on each virtual machine.
- Check the number of virtual machines assigned to each physical NIC. If necessary, perform load balancing by moving virtual machines to different vSwitches or by adding more NICs to the host. You can also move virtual machines to another host or increase the host CPU or virtual machine CPU.
- If possible, use vmxnet3 NIC drivers, which are available with VMware Tools. They are optimized for high performance.
- If virtual machines running on the same host communicate with each other, connect them to the same vSwitch to avoid the cost of transferring packets over the physical network.
- Assign each physical NIC to a port group and a vSwitch.
- Use separate physical NICs to handle the different traffic streams, such as network packets generated by virtual machines, iSCSI protocols, VMotion tasks.
- Ensure that the physical NIC capacity is large enough to handle the network traffic on that vSwitch. If the capacity is not enough, consider using a high-bandwidth physical NIC (10Gbps) or moving some virtual machines to a vSwitch with a lighter load or to a new vSwitch.
- If packets are being dropped at the vSwitch port, increase the virtual network driver ring buffers where applicable.
- Verify that the reported speed and duplex settings for the physical NIC match the hardware expectations and that the hardware is configured to run at its maximum capability. For example, verify that NICs with 1Gbps are not reset to 100Mbps because they are connected to an older switch.
- Verify that all NICs are running in full duplex mode. Hardware connectivity issues might result in a NIC resetting itself to a lower speed or half duplex mode.
- Use vNICs that are TSO-capable, and verify that TSO-Jumbo Frames are enabled where possible.
Tune ESXi host CPU configuration
Official Documentation:
vSphere Resource Management Guide, Chapter 3, CPU Virtualization Basics, Page 15 and also Chapter 4, Administering CPU Resources, Page 17
Performance Best Practices for VMware vSphere 5.0, Chapter 2 ESXi and Virtual Machines, Section ESXi CPU Considerations, page 19
CPU virtualization emphasizes performance and runs directly on the processor whenever possible. The underlying physical resources are used whenever possible and the virtualization layer runs instructions only
as needed to make virtual machines operate as if they were running directly on a physical machine. CPU virtualization is not the same thing as emulation. ESXi does not use emulation to run virtual CPUs. With emulation, all operations are run in software by an emulator. A software emulator allows programs to run on a computer system other than the one for which they were originally written. The emulator does this by emulating, or reproducing, the original computer’s behavior by accepting the same data or inputs and achieving the same results. Emulation provides portability and runs software designed for one platform across several platforms.
When CPU resources are overcommitted, the ESXi host time-slices the physical processors across all virtual machines so each virtual machine runs as if it has its specified number of virtual processors. When an ESXi host runs multiple virtual machines, it allocates to each virtual machine a share of the physical resources. With the default resource allocation settings, all virtual machines associated with the same host receive an equal share of CPU per virtual CPU. This means that a single-processor virtual machines is assigned only half of the resources of a dual-processor virtual machine.
Software-Based CPU Virtualization
With software-based CPU virtualization, the guest application code runs directly on the processor, while the guest privileged code is translated and the translated code executes on the processor.
The translated code is slightly larger and usually executes more slowly than the native version. As a result, guest programs, which have a small privileged code component, run with speeds very close to native. Programs with a significant privileged code component, such as system calls, traps, or page table updates can run slower in the virtualized environment.
Hardware-Assisted CPU Virtualization
Certain processors provide hardware assistance for CPU virtualization.
When using this assistance, the guest can use a separate mode of execution called guest mode. The guest code, whether application code or privileged code, runs in the guest mode. On certain events, the processor exits
out of guest mode and enters root mode. The hypervisor executes in the root mode, determines the reason for the exit, takes any required actions, and restarts the guest in guest mode.
When you use hardware assistance for virtualization, there is no need to translate the code. As a result, system calls or trap-intensive workloads run very close to native speed. Some workloads, such as those involving updates to page tables, lead to a large number of exits from guest mode to root mode. Depending on the number of such exits and total time spent in exits, hardware-assisted CPU virtualization can speed up execution significantly.
Virtualization and Processor-Specific Behavior
Although VMware software virtualizes the CPU, the virtual machine detects the specific model of the processor on which it is running.
Processor models might differ in the CPU features they offer, and applications running in the virtual machine can make use of these features. Therefore, it is not possible to use vMotion® to migrate virtual machines between systems running on processors with different feature sets. You can avoid this restriction, in some cases, by using Enhanced vMotion Compatibility (EVC) with processors that support this feature. See the vCenter Server and Host Management documentation for more information.
Performance Implications of CPU Virtualization
CPU virtualization adds varying amounts of overhead depending on the workload and the type of virtualization used.
An application is CPU-bound if it spends most of its time executing instructions rather than waiting for external events such as user interaction, device input, or data retrieval. For such applications, the CPU virtualization overhead includes the additional instructions that must be executed. This overhead takes CPU processing time that the application itself can use. CPU virtualization overhead usually translates into a reduction in overall performance.
For applications that are not CPU-bound, CPU virtualization likely translates into an increase in CPU use. If spare CPU capacity is available to absorb the overhead, it can still deliver comparable performance in terms of overall throughput.
ESXi supports up to 32 virtual processors (CPUs) for each virtual machine.
NOTE Deploy single-threaded applications on uniprocessor virtual machines, instead of on SMP virtual machines, for the best performance and resource use.
Single-threaded applications can take advantage only of a single CPU. Deploying such applications in dualprocessor virtual machines does not speed up the application. Instead, it causes the second virtual CPU to use physical resources that other virtual machines could otherwise use.
Administering CPU Resources
You can configure virtual machines with one or more virtual processors, each with its own set of registers and control structures.
When a virtual machine is scheduled, its virtual processors are scheduled to run on physical processors. The VMkernel Resource Manager schedules the virtual CPUs on physical CPUs, thereby managing the virtual machine’s access to physical CPU resources. ESXi supports virtual machines with up to 32 virtual CPUs.
Specifying CPU Configuration
You can specify CPU configuration to improve resource management. However, if you do not customize CPU configuration, the ESXi host uses defaults that work well in most situations.
You can specify CPU configuration in the following ways:
- Use the attributes and special features available through the vSphere Client. The vSphere Client graphical user interface (GUI) allows you to connect to the ESXi host or a vCenter Server system.
- Use advanced settings under certain circumstances.
- Use the vSphere SDK for scripted CPU allocation.
- Use hyperthreading.
Multicore Processors
Multicore processors provide many advantages for a host performing multitasking of virtual machines.
Intel and AMD have each developed processors which combine two or more processor cores into a single integrated circuit (often called a package or socket). VMware uses the term socket to describe a single package which can have one or more processor cores with one or more logical processors in each core.
A dual-core processor, for example, can provide almost double the performance of a single-core processor, by allowing two virtual CPUs to execute at the same time. Cores within the same processor are typically configured with a shared last-level cache used by all cores, potentially reducing the need to access slower main memory. A shared memory bus that connects a physical processor to main memory can limit performance of
its logical processors if the virtual machines running on them are running memory-intensive workloads which compete for the same memory bus resources.
Each logical processor of each processor core can be used independently by the ESXi CPU scheduler to execute virtual machines, providing capabilities similar to SMP systems. For example, a two-way virtual machine can
have its virtual processors running on logical processors that belong to the same core, or on logical processors on different physical cores.
The ESXi CPU scheduler can detect the processor topology and the relationships between processor cores and the logical processors on them. It uses this information to schedule virtual machines and optimize performance.
The ESXi CPU scheduler can interpret processor topology, including the relationship between sockets, cores, and logical processors. The scheduler uses topology information to optimize the placement of virtual CPUs
onto different sockets to maximize overall cache utilization, and to improve cache affinity by minimizing virtual CPU migrations.
In undercommitted systems, the ESXi CPU scheduler spreads load across all sockets by default. This improves performance by maximizing the aggregate amount of cache available to the running virtual CPUs. As a result,
the virtual CPUs of a single SMP virtual machine are spread across multiple sockets (unless each socket is also a NUMA node, in which case the NUMA scheduler restricts all the virtual CPUs of the virtual machine to
reside on the same socket.)
In some cases, such as when an SMP virtual machine exhibits significant data sharing between its virtual CPUs, this default behavior might be sub-optimal. For such workloads, it can be beneficial to schedule all of the virtual CPUs on the same socket, with a shared last-level cache, even when the ESXi host is undercommitted. In such scenarios, you can override the default behavior of spreading virtual CPUs across packages by including the following configuration option in the virtual machine’s .vmx configuration file:
sched.cpu.vsmpConsolidate=”TRUE”.
Hyperthreading
Hyperthreading technology allows a single physical processor core to behave like two logical processors. The processor can run two independent applications at the same time. To avoid confusion between logical and physical processors, Intel refers to a physical processor as a socket, and the discussion in this chapter uses that terminology as well.
Intel Corporation developed hyperthreading technology to enhance the performance of its Pentium IV and Xeon processor lines. Hyperthreading technology allows a single processor core to execute two independent threads simultaneously.
While hyperthreading does not double the performance of a system, it can increase performance by better utilizing idle resources leading to greater throughput for certain important workload types. An application running on one logical processor of a busy core can expect slightly more than half of the throughput that it obtains while running alone on a non-hyperthreaded processor. Hyperthreading performance improvements are highly application-dependent, and some applications might see performance degradation with hyperthreading because many processor resources (such as the cache) are shared between logical processors.
NOTE On processors with Intel Hyper-Threading technology, each core can have two logical processors which share most of the core’s resources, such as memory caches and functional units. Such logical processors are usually called threads.
Many processors do not support hyperthreading and as a result have only one thread per core. For such processors, the number of cores also matches the number of logical processors. The following processors support hyperthreading and have two threads per core.
- Processors based on the Intel Xeon 5500 processor microarchitecture.
- Intel Pentium 4 (HT-enabled)
- Intel Pentium EE 840 (HT-enabled)
Hyperthreading and ESXi Hosts
A host that is enabled for hyperthreading should behave similarly to a host without hyperthreading. You might need to consider certain factors if you enable hyperthreading, however.
ESXi hosts manage processor time intelligently to guarantee that load is spread smoothly across processor cores in the system. Logical processors on the same core have consecutive CPU numbers, so that CPUs 0 and 1 are on the first core together, CPUs 2 and 3 are on the second core, and so on. Virtual machines are preferentially scheduled on two different cores rather than on two logical processors on the same core.
If there is no work for a logical processor, it is put into a halted state, which frees its execution resources and allows the virtual machine running on the other logical processor on the same core to use the full execution resources of the core. The VMware scheduler properly accounts for this halt time, and charges a virtual machine running with the full resources of a core more than a virtual machine running on a half core. This approach to
processor management ensures that the server does not violate any of the standard ESXi resource allocation rules.
Consider your resource management needs before you enable CPU affinity on hosts using hyperthreading. For example, if you bind a high priority virtual machine to CPU 0 and another high priority virtual machine to CPU 1, the two virtual machines have to share the same physical core. In this case, it can be impossible to meet the resource demands of these virtual machines. Ensure that any custom affinity settings make sense for a hyperthreaded system.
Quarantining
In certain rare circumstances, ESXi might detect that an application is interacting badly with the Pentium IV hyperthreading technology. (This does not apply to systems based on the Intel Xeon 5500 processor microarchitecture.) In such cases, quarantining, which is transparent to the user, might be necessary.
For example, certain types of self-modifying code can disrupt the normal behavior of the Pentium IV trace cache and can lead to substantial slowdowns (up to 90 percent) for an application sharing a core with the problematic code. In those cases, the ESXi host quarantines the virtual CPU running this code and places its virtual machine in the none or internal mode, as appropriate.
Using CPU Affinity
By specifying a CPU affinity setting for each virtual machine, you can restrict the assignment of virtual machines to a subset of the available processors in multiprocessor systems. By using this feature, you can assign each virtual machine to processors in the specified affinity set.
CPU affinity specifies virtual machine-to-processor placement constraints and is different from the relationship created by a VM-VM or VM-Host affinity rule, which specifies virtual machine-to-virtual machine host placement constraints.
In this context, the term CPU refers to a logical processor on a hyperthreaded system and refers to a core on a non-hyperthreaded system.
The CPU affinity setting for a virtual machine applies to all of the virtual CPUs associated with the virtual machine and to all other threads (also known as worlds) associated with the virtual machine. Such virtual machine threads perform processing required for emulating mouse, keyboard, screen, CD-ROM, and miscellaneous legacy devices.
In some cases, such as display-intensive workloads, significant communication might occur between the virtual CPUs and these other virtual machine threads. Performance might degrade if the virtual machine’s affinity setting prevents these additional threads from being scheduled concurrently with the virtual machine’s virtual CPUs. Examples of this include a uniprocessor virtual machine with affinity to a single CPU or a two-way SMP
virtual machine with affinity to only two CPUs.
For the best performance, when you use manual affinity settings, VMware recommends that you include at least one additional physical CPU in the affinity setting to allow at least one of the virtual machine’s threads to be scheduled at the same time as its virtual CPUs. Examples of this include a uniprocessor virtual machine with affinity to at least two CPUs or a two-way SMP virtual machine with affinity to at least three CPUs.
Assign a Virtual Machine to a Specific Processor
Using CPU affinity, you can assign a virtual machine to a specific processor. This allows you to restrict the assignment of virtual machines to a specific available processor in multiprocessor systems.
Procedure
- In the vSphere Client inventory panel, select a virtual machine and select Edit Settings.
- Select the Resources tab and select Advanced CPU.
- Click the Run on processor(s) button.
- Select the processors where you want the virtual machine to run and click OK.
Potential Issues with CPU Affinity
Before you use CPU affinity, you might need to consider certain issues.
Potential issues with CPU affinity include:
- For multiprocessor systems, ESXi systems perform automatic load balancing. Avoid manual specification of virtual machine affinity to improve the scheduler’s ability to balance load across processors.
- Affinity can interfere with the ESXi host’s ability to meet the reservation and shares specified for a virtual machine.
- Because CPU admission control does not consider affinity, a virtual machine with manual affinity settings might not always receive its full reservation.
Virtual machines that do not have manual affinity settings are not adversely affected by virtual machines with manual affinity settings.
- When you move a virtual machine from one host to another, affinity might no longer apply because the new host might have a different number of processors.
- The NUMA scheduler might not be able to manage a virtual machine that is already assigned to certain processors using affinity.
- Affinity can affect the host’s ability to schedule virtual machines on multicore or hyperthreaded processors to take full advantage of resources shared on such processors.
Host Power Management Policies
ESXi can take advantage of several power management features that the host hardware provides to adjust the trade-off between performance and power use. You can control how ESXi uses these features by selecting a power management policy.
In general, selecting a high-performance policy provides more absolute performance, but at lower efficiency (performance per watt). Lower-power policies provide less absolute performance, but at higher efficiency.
ESXi provides five power management policies. If the host does not support power management, or if the BIOS settings specify that the host operating system is not allowed to manage power, only the Not Supported policy
is available.
You select a policy for a host using the vSphere Client. If you do not select a policy, ESXi uses Balanced by default.
| Power Management Policy | Description |
| Not supported | The host does not support any power management featuresor power management is not enabled in the BIOS. |
| High Performance | The VMkernel detects certain power management features,but will not use them unless the BIOS requests them forpower capping or thermal events. |
| Balanced (Default) | The VMkernel uses the available power managementfeatures conservatively to reduce host energy consumptionwith minimal compromise to performance. |
| Low Power | The VMkernel aggressively uses available powermanagement features to reduce host energy consumption atthe risk of lower performance. |
| Custom | The VMkernel bases its power management policy on thevalues of several advanced configuration parameters. Youcan set these parameters in the vSphere Client Advanced
Settings dialog box. |
When a CPU runs at lower frequency, it can also run at lower voltage, which saves power. This type of power management is typically called Dynamic Voltage and Frequency Scaling (DVFS). ESXi attempts to adjust CPU frequencies so that virtual machine performance is not affected.
When a CPU is idle, ESXi can take advantage of deep halt states (known as C-states). The deeper the C-state, the less power the CPU uses, but the longer it takes for the CPU to resume running. When a CPU becomes idle, ESXi applies an algorithm to predict how long it will be in an idle state and chooses an appropriate C-state to enter. In power management policies that do not use deep C-states, ESXi uses only the shallowest halt state (C1) for idle CPUs.
More information
Performance Best Practices for VMware vSphere 5.0, Chapter 2 ESXi and Virtual Machines, Section ESXi CPU Considerations, page 19
Tune ESXi host storage configuration
Official Documentation:
vSphere Resource Management Guide, Chapter 7, Managing Storage I/O Control, Page 39.
vSphere Monitoring and Performance Guide, Chapter 1, Monitoring Storage Resources, Page 31. This section contains information on using Storage Reports and Storage Maps
Performance Best Practices for VMware vSphere 5.0, Chapter 2 ESXi and Virtual Machines, Section ESXi Storage Considerations, page 30.
vSphere Storage I/O Control allows cluster-wide storage I/O prioritization, which allows better workload consolidation and helps reduce extra costs associated with over provisioning.
Storage I/O Control extends the constructs of shares and limits to handle storage I/O resources. You can control the amount of storage I/O that is allocated to virtual machines during periods of I/O congestion, which ensures that more important virtual machines get preference over less important virtual machines for I/O resource allocation.
When you enable Storage I/O Control on a datastore, ESXi begins to monitor the device latency that hosts observe when communicating with that datastore. When device latency exceeds a threshold, the datastore is
considered to be congested and each virtual machine that accesses that datastore is allocated I/O resources in proportion to their shares. You set shares per virtual machine. You can adjust the number for each based on
need.
Storage I/O Control Requirements
Storage I/O Control has several requirements and limitations.
- Datastores that are Storage I/O Control-enabled must be managed by a single vCenter Server system.
- Storage I/O Control is supported on Fibre Channel-connected, iSCSI-connected, and NFS-connected storage. Raw Device Mapping (RDM) is not supported.
- Storage I/O Control does not support datastores with multiple extents.
- Before using Storage I/O Control on datastores that are backed by arrays with automated storage tiering capabilities, check the VMware Storage/SAN Compatibility Guide to verify whether your automated tiered storage array has been certified to be compatible with Storage I/O Control.
Automated storage tiering is the ability of an array (or group of arrays) to migrate LUNs/volumes or parts of LUNs/volumes to different types of storage media (SSD, FC, SAS, SATA) based on user-set policies and current I/O patterns. No special certification is required for arrays that do not have these automatic migration/tiering features, including those that provide the ability to manually migrate data between different types of storage media.
Storage I/O Control Resource Shares and Limits
You allocate the number of storage I/O shares and upper limit of I/O operations per second (IOPS) allowed for each virtual machine. When storage I/O congestion is detected for a datastore, the I/O workloads of the virtual
machines accessing that datastore are adjusted according to the proportion of virtual machine shares each virtual machine has.
Storage I/O shares are similar to those used for memory and CPU resource allocation, which are described in “Resource Allocation Shares,” on page 11. These shares represent the relative importance of a virtual machine
with regard to the distribution of storage I/O resources. Under resource contention, virtual machines with higher share values have greater access to the storage array, which typically results in higher throughput and lower latency.
When you allocate storage I/O resources, you can limit the IOPS that are allowed for a virtual machine. By default, these are unlimited. If a virtual machine has more than one virtual disk, you must set the limit on all of its virtual disks. Otherwise, the limit will not be enforced for the virtual machine. In this case, the limit on the virtual machine is the aggregation of the limits for all virtual disks.
The benefits and drawbacks of setting resource limits are described in “Resource Allocation Limit,” on page 12. If the limit you want to set for a virtual machine is in terms of MB per second instead of IOPS, you can convert MB per second into IOPS based on the typical I/O size for that virtual machine. For example, to restrict a backup application with 64KB IOs to 10MB per second, set a limit of 160 IOPS.
View Storage I/O Control Shares and Limits
You can view the shares and limits for all virtual machines running on a datastore. Viewing this information allows you to compare the settings of all virtual machines that are accessing the datastore, regardless of the cluster in which they are running.
Procedure
- Select the datastore in the vSphere Client inventory.
- Click the Virtual Machines tab.
The tab displays each virtual machine running on the datastore and the associated shares value, IOPS limit, and percentage of datastore shares.
Monitor Storage I/O Control Shares
Use the datastore Performance tab to monitor how Storage I/O Control handles the I/O workloads of the virtual machines accessing a datastore based on their shares.
Datastore performance charts allow you to monitor the following information:
- Average latency and aggregated IOPS on the datastore
- Latency among hosts
- Queue depth among hosts
- Read/write IOPS among hosts
- Read/write latency among virtual machine disks
- Read/write IOPS among virtual machine disks
Procedure
- Select the datastore in the vSphere Client inventory and click the Performance tab.
- From the View drop-down menu, select Performance.
For more information, see the vSphere Monitoring and Performance documentation.
Set Storage I/O Control Resource Shares and Limits
Allocate storage I/O resources to virtual machines based on importance by assigning a relative amount of shares to the virtual machine.
Unless virtual machine workloads are very similar, shares do not necessarily dictate allocation in terms of I/O operations or megabytes per second. Higher shares allow a virtual machine to keep more concurrent I/O operations pending at the storage device or datastore compared to a virtual machine with lower shares. Two virtual machines might experience different throughput based on their workloads.
Procedure
- Select a virtual machine in the vSphere Client inventory.
- Click the Summary tab and click Edit Settings.
- Click the Resources tab and select Disk.
- Select a virtual hard disk from the list.
- Click the Shares column to select the relative amount of shares to allocate to the virtual machine (Low, Normal, or High).
You can select Custom to enter a user-defined shares value.
- Click the Limit – IOPS column and enter the upper limit of storage resources to allocate to the virtual machine.
IOPS are the number of I/O operations per second. By default, IOPS are unlimited. You select Low (500), Normal (1000), or High (2000), or you can select Custom to enter a user-defined number of shares.
- Click OK.
Shares and limits are reflected on the Resource Allocation tab for the host and cluster.
Enable Storage I/O Control
When you enable Storage I/O Control, ESXi monitors datastore latency and adjusts the I/O load sent to it, if datastore average latency exceeds the threshold.
Procedure
- In the vSphere Client inventory, select a datastore and click the Configuration tab.
- Click Properties.
- Under Storage I/O Control, select the Enabled check box.
- Click Close.
On the Datastores tab, the Storage I/O Control column shows that Storage I/O Control is enabled for the datastore.
Set Storage I/O Control Threshold Value
The congestion threshold value for a datastore is the upper limit of latency that is allowed for a datastore before Storage I/O Control begins to assign importance to the virtual machine workloads according to their shares.
You do not need to adjust the threshold setting in most environments.
CAUTION Storage I/O Control will not function correctly unless all datatores that share the same spindles on the array have the same congestion threshold.
If you change the congestion threshold setting, set the value based on the following considerations.
- A higher value typically results in higher aggregate throughput and weaker isolation. Throttling will not occur unless the overall average latency is higher than the threshold.
- If throughput is more critical than latency, do not set the value too low. For example, for Fibre Channel disks, a value below 20 ms could lower peak disk throughput. A very high value (above 50 ms) might allow very high latency without any significant gain in overall throughput.
- A lower value will result in lower device latency and stronger virtual machine I/O performance isolation.
Stronger isolation means that the shares controls are enforced more often. Lower device latency translates into lower I/O latency for the virtual machines with the highest shares, at the cost of higher I/O latency experienced by the virtual machines with fewer shares.
- If latency is more important, a very low value (lower than 20 ms) will result in lower device latency and better isolation among I/Os at the potential cost of a decrease in aggregate datastore throughput.
Prerequisites
Verify that Storage I/O Control is enabled.
Procedure
- In the vSphere Client inventory, select a datastore and click the Configuration tab.
- Click Properties.
- Under Storage I/O Control, select the Enabled check box.
- (Optional) Click Advanced to edit the congestion threshold value for the datastore.
The value must be between 10 ms and 100 ms.
- (Optional) Click Reset to restore the congestion threshold setting to the default value (30 ms).
- Click OK and click Close.
ESXi Storage Considerations
This subsection provides guidance regarding storage considerations in ESXi.
VMware vStorage APIs for Array Integration (VAAI)
- For the best storage performance, consider using VAAI-capable storage hardware. The performance gains from VAAI (described in “Hardware Storage Considerations” on page 11) can be especially noticeable in VDI environments (where VAAI can improve boot-storm and desktop workload performance), large data centers (where VAAI can improve the performance of mass virtual machine provisioning and of thin-provisioned virtual disks), and in other large-scale deployments.
If your storage hardware supports VAAI, ESXi will automatically recognize and use these capabilities. To confirm that your hardware does support VAAI and that it is being used, follow the instructions in VMware KB article 1021976. If you determine that VAAI is not being used, contact your storage hardware vendor to see if a firmware upgrade is required for VAAI support.
LUN Access Methods, Virtual Disk Modes, and Virtual Disk Types
-
ESXi supports raw device mapping (RDM), which allows management and access of raw SCSI disks or LUNs as VMFS files. An RDM is a special file on a VMFS volume that acts as a proxy for a raw device.
The RDM file contains metadata used to manage and redirect disk accesses to the physical device. Ordinary VMFS is recommended for most virtual disk storage, but raw disks might be desirable in some cases.
You can use RDMs in virtual compatibility mode or physical compatibility mode:
- Virtual mode specifies full virtualization of the mapped device, allowing the guest operating system to treat the RDM like any other virtual disk file in a VMFS volume.
- Physical mode specifies minimal SCSI virtualization of the mapped device, allowing the greatest flexibility for SAN management software or other SCSI target-based software running in the virtual machine.
For more information about RDM, see vSphere Storage.
- Virtual mode specifies full virtualization of the mapped device, allowing the guest operating system to treat the RDM like any other virtual disk file in a VMFS volume.
-
ESXi supports three virtual disk modes: Independent persistent, Independent nonpersistent, and Snapshot.
NOTE An independent disk does not participate in virtual machine snapshots. That is, the disk state will
be independent of the snapshot state and creating, consolidating, or reverting to snapshots will have no
effect on the disk.
These modes have the following characteristics:
- Independent persistent – In this mode changes are persistently written to the disk, providing the best performance.
- Independent nonpersistent – In this mode disk writes are appended to a redo log. The redo log is erased when you power off the virtual machine or revert to a snapshot, causing any changes made to the disk to be discarded. When a virtual machine reads from an independent nonpersistent mode disk, ESXi first checks the redo log (by looking at a directory of disk blocks contained in the redo log) and, if the relevant blocks are listed, reads that information. Otherwise, the read goes to the base disk for the virtual machine. Because of these redo logs, which track the changes in a virtual machine’s file system and allow you to commit changes or revert to a prior point in time, performance might not be as high as independent persistent mode disks.
- Snapshot – In this mode disk writes are appended to a redo log that persists between power cycles.
Thus, like the independent nonpersistent mode disks described above, snapshot mode disk performance might not be as high as independent persistent mode disks.
- Independent persistent – In this mode changes are persistently written to the disk, providing the best performance.
-
ESXi supports multiple virtual disk types:
-
Thick – Thick virtual disks, which have all their space allocated at creation time, are further divided into two types: eager zeroed and lazy zeroed.
- Eager-zeroed – An eager-zeroed thick disk has all space allocated and zeroed out at the time of creation. This increases the time it takes to create the disk, but results in the best performance, even on the first write to each block.
NOTE The use of VAAI-capable SAN storage (described in “Hardware Storage Considerations” on page 11) can speed up eager-zeroed thick disk creation by offloading zeroing operations to the storage array.
- Lazy-zeroed – A lazy-zeroed thick disk has all space allocated at the time of creation, but each block is zeroed only on first write. This results in a shorter creation time, but reduced performance the first time a block is written to. Subsequent writes, however, have the same performance as on eager-zeroed thick disks.
NOTE The use of VAAI-capable SAN or NAS storage can improve lazy-zeroed thick disk first-time-write performance by offloading zeroing operations to the storage array.
- Eager-zeroed – An eager-zeroed thick disk has all space allocated and zeroed out at the time of creation. This increases the time it takes to create the disk, but results in the best performance, even on the first write to each block.
- Thin – Space required for a thin-provisioned virtual disk is allocated and zeroed upon first write, as opposed to upon creation. There is a higher I/O cost (similar to that of lazy-zeroed thick disks) during the first write to an unwritten file block, but on subsequent writes thin-provisioned disks have the same performance as eager-zeroed thick disks.
NOTE The use of VAAI-capable SAN storage can improve thin-provisioned disk first-time-write performance by improving file locking capability and offloading zeroing operations to the storage array.
-
All three types of virtual disks can be created using the vSphere Client (Edit virtual machine settings > Hardware tab > Add… > Hard Disk). At the Create a Disk window:
- Selecting Flat Disk creates a lazy-zeroed thick disk.
- Selecting Thick Provision creates an eager-zeroed thick disk.
- Selecting Thin Provision creates a thin disk.
Virtual disks can also be created from the vSphere Command-Line Interface (vSphere CLI) using vmkfstools. For details refer to vSphere Command-Line Interface Reference and the vmkfstools man page.
NOTE Virtual disks created on NFS volumes can be either thin-provisioned or eager-zeroed thick unless the NAS device supports VAAI, which can add support for lazy-zeroed thick provisioning.
Partition Alignment
The alignment of file system partitions can impact performance. VMware makes the following recommendations for VMFS partitions:
- Like other disk-based filesystems, VMFS filesystems suffer a performance penalty when the partition is unaligned. Using the vSphere Client to create VMFS partitions avoids this problem since, beginning with ESXi 5.0, it automatically aligns VMFS3 or VMFS5 partitions along the 1MB boundary.
NOTE If a VMFS3 partition was created using an earlier version of ESX/ESXi that aligned along the 64KB boundary, and that filesystem is then upgraded to VMFS5, it will retain its 64KB alignment. 1MB alignment can be obtained by deleting the partition and recreating it using the vSphere Client and an ESXi 5.0 host.
- To manually align your VMFS partitions, check your storage vendor’s recommendations for the partition starting block. If your storage vendor makes no specific recommendation, use a starting block that is a multiple of 8KB.
- Before performing an alignment, carefully evaluate the performance impact of the unaligned VMFS partition on your particular workload. The degree of improvement from alignment is highly dependent on workloads and array types. You might want to refer to the alignment recommendations from your array vendor for further information.
SAN Multipathing
- By default, ESXi uses the Most Recently Used (MRU) path policy for devices on Active/Passive storage arrays. Do not use Fixed path policy for Active/Passive storage arrays to avoid LUN path thrashing. For more information, see the VMware SAN Configuration Guide.
NOTE With some Active/Passive storage arrays that support ALUA (described below) ESXi can use Fixed path policy without risk of LUN path thrashing.
- By default, ESXi uses the Fixed path policy for devices on Active/Active storage arrays. When using this policy you can maximize the utilization of your bandwidth to the storage array by designating preferred paths to each LUN through different storage controllers. For more information, see the VMware SAN Configuration Guide.
- In addition to the Fixed and MRU path policies, ESXi can also use the Round Robin path policy, which can improve storage performance in some environments. Round Robin policy provides load balancing by cycling I/O requests through all Active paths, sending a fixed (but configurable) number of I/O requests through each one in turn.
- If your storage array supports ALUA (Asymmetric Logical Unit Access), enabling this feature on the array can improve storage performance in some environments. ALUA, which is automatically detected by ESXi, allows the array itself to designate paths as “Active Optimized.” When ALUA is combined with the Round Robin path policy, ESXi cycles I/O requests through these Active Optimized paths.
Storage I/O Resource Allocation
VMware vSphere provides mechanisms to dynamically allocate storage I/O resources, allowing critical workloads to maintain their performance even during peak load periods when there is contention for I/O resources. This allocation can be performed at the level of the individual host or for an entire datastore. Both methods are described below.
- The storage I/O resources available to an ESXi host can be proportionally allocated to the virtual machines running on that host by using the vSphere Client to set disk shares for the virtual machines (select Edit virtual machine settings, choose the Resources tab, select Disk, then change the Shares field).
- The maximum storage I/O resources available to each virtual machine can be set using limits. These limits, set in I/O operations per second (IOPS), can be used to provide strict isolation and control on certain workloads. By default, these are set to unlimited. When set to any other value, ESXi enforces the limits even if the underlying datastores are not fully utilized.
- An entire datastore’s I/O resources can be proportionally allocated to the virtual machines accessing that datastore using Storage I/O Control (SIOC). When enabled, SIOC evaluates the disk share values set for all virtual machines accessing a datastore and allocates that datastore’s resources accordingly. SIOC can be enabled using the vSphere Client (select a datastore, choose the Configuration tab, click Properties… (at the far right), then under Storage I/O Control add a checkmark to the Enabled box).
With SIOC disabled (the default), all hosts accessing a datastore get an equal portion of that datastore’s resources. Any shares values determine only how each host’s portion is divided amongst its virtual machines.
With SIOC enabled, the disk shares are evaluated globally and the portion of the datastore’s resources each host receives depends on the sum of the shares of the virtual machines running on that host relative to the sum
of the shares of all the virtual machines accessing that datastore.
General ESXi Storage Recommendations
- I/O latency statistics can be monitored using esxtop (or resxtop), which reports device latency, time spent in the kernel, and latency seen by the guest operating system.
- Make sure that the average latency for storage devices is not too high. This latency can be seen in esxtop (or resxtop) by looking at the GAVG/cmd metric. A reasonable upper value for this metric depends on your storage subsystem. If you use SIOC, you can use your SIOC setting as a guide — your GAVG/cmd value should be well below your SIOC setting. The default SIOC setting is 30 ms, but if you have very fast storage (SSDs, for example) you might have reduced that value. For further information on average latency see VMware KB article 1008205.
- You can adjust the maximum number of outstanding disk requests per VMFS volume, which can help equalize the bandwidth across virtual machines using that volume. For further information see Vmware KB article 1268.
- If you will not be using Storage I/O Control and often observe QFULL/BUSY errors, enabling and configuring queue depth throttling might improve storage performance. This feature can significantly reduce the number of commands returned from the array with a QFULL/BUSY error. If any system accessing a particular LUN or storage array port has queue depth throttling enabled, all systems (both ESX hosts and other systems) accessing that LUN or storage array port should use an adaptive queue depth algorithm. Queue depth throttling is not compatible with Storage DRS. For more information about both QFULL/BUSY errors and this feature see KB article 1008113.
Running Storage Latency Sensitive Applications
By default the ESXi storage stack is configured to drive high storage throughout at low CPU cost. While this default configuration provides better scalability and higher consolidation ratios, it comes at the cost of potentially higher storage latency. Applications that are highly sensitive to storage latency might therefore benefit from the following:
-
Adjust the host power management settings:
Some of the power management features in newer server hardware can increase storage latency. Disable them as follows:
- Set the ESXi host power policy to Maximum performance (as described in “Host Power Management in ESXi” on page 23; this is the preferred method) or disable power management in the BIOS (as described in “Power Management BIOS Settings” on page 14).
- Disable C1E and other C-states in BIOS (as described in “Power Management BIOS Settings” on page 14).
- Enable Turbo Boost in BIOS (as described in “General BIOS Settings” on page 14).
- Set the ESXi host power policy to Maximum performance (as described in “Host Power Management in ESXi” on page 23; this is the preferred method) or disable power management in the BIOS (as described in “Power Management BIOS Settings” on page 14).
Configure and apply advanced ESXi host attributes
Official Documentation:
vSphere Resource Management Guide,
Chapter 14, Advanced Attributes, Page 101 describes how to set advanced Host attributes and Virtual Machine Attributes.
You can set advanced attributes for hosts or individual virtual machines to help you customize resource management.
In most cases, adjusting the basic resource allocation settings (reservation, limit, shares) or accepting default settings results in appropriate resource allocation. However, you can use advanced attributes to customize resource management for a host or a specific virtual machine.
Set Advanced Host Attributes
You can set advanced attributes for a host.
CAUTION Changing advanced options is considered unsupported unless VMware technical support or a KB article instruct you to do so. In all other cases, changing these options is considered unsupported. In most cases, the default settings produce the optimum result.
Procedure
- In the vSphere Client, select the host in the inventory.
- Click the Configuration tab.
- Under Software, click Advanced Settings.
- In the Advanced Settings dialog box, select the appropriate item (for example, CPU or Mem).
- Locate the attribute in the right panel and edit the value.
- Click OK.
Advanced Memory Attributes
You can use the advanced memory attributes to customize memory resource usage.
| Attribute | Description | Default |
| Mem.SamplePeriod | Specifies the periodic time interval, measured in seconds of thevirtual machine’s execution time, over which memory activity ismonitored to estimate working set sizes. | 60 |
| Mem.BalancePeriod | Specifies the periodic time interval, in seconds, for automaticmemory reallocations. Significant changes in the amount of freememory also trigger reallocations. | 15 |
| Mem.IdleTax | Specifies the idle memory tax rate, as a percentage. This taxeffectively charges virtual machines more for idle memory than formemory they are actively using. A tax rate of 0 percent defines an
allocation policy that ignores working sets and allocates memory strictly based on shares. A high tax rate results in an allocation policy that allows idle memory to be reallocated away from virtual machines that are unproductively hoarding it. |
75 |
| Mem.ShareScanGHz | Specifies the maximum amount of memory pages to scan (persecond) for page sharing opportunities for each GHz of availablehost CPU resource. For example, defaults to 4 MB/sec per 1 GHz. | 4 |
| Mem.ShareScanTime | Specifies the time, in minutes, within which an entire virtualmachine is scanned for page sharing opportunities. Defaults to 60minutes. | 60 |
| Mem.CtlMaxPercent | Limits the maximum amount of memory reclaimed from any virtualmachine using the memory balloon driver (vmmemctl), based on apercentage of its configured memory size. Specify 0 to disable
reclamation for all virtual machines. |
65 |
| Mem.AllocGuestLargePage | Enables backing of guest large pages with host large pages. ReducesTLB misses and improves performance in server workloads that useguest large pages. 0=disable. | 1 |
| Mem.AllocUsePSharePoolandMem.AllocUseGuestPool | Reduces memory fragmentation by improving the probability ofbacking guest large pages with host large pages. If host memory isfragmented, the availability of host large pages is reduced. 0 =
disable. |
15 |
| Mem.MemZipEnable | Enables memory compression for the host. 0 = disable. | 1 |
| Mem.MemZipMaxPct | Specifies the maximum size of the compression cache in terms of themaximum percentage of each virtual machine’s memory that can bestored as compressed memory. | 10 |
| LPage.LPageDefragEnable | Enables large page defragmentation. 0 = disable. | 1 |
| LPage.LPageDefragRateVM | Maximum number of large page defragmentation attempts persecond per virtual machine. Accepted values range from 1 to 1024. | 32 |
| LPage.LPageDefragRateTotal | Maximum number of large page defragmentation attempts persecond. Accepted values range from 1 to 10240. | 256 |
| LPage.LPageAlwaysTryForNPT | Try to allocate large pages for nested page tables (called ‘RVI’ byAMD or ‘EPT’ by Intel). If you enable this option, all guest memoryis backed with large pages in machines that use nested page tables
(for example, AMD Barcelona). If NPT is not available, only some portion of guest memory is backed with large pages. 0= disable. |
1 |
Advanced NUMA Attributes
You can use the advanced NUMA attributes to customize NUMA usage.
| Attribute | Description | Default |
| Numa.RebalancePeriod | Controls the frequency of rebalance periods, specified inmilliseconds. More frequent rebalancing can increase CPUoverheads, particularly on machines with a large number of
running virtual machines. More frequent rebalancing can also improve fairness. |
2000 |
| Numa.MigImbalanceThreshold | The NUMA rebalancer computes the CPU imbalancebetween nodes, accounting for the difference between eachvirtual machine’s CPU time entitlement and its actual
consumption. This option controls the minimum load imbalance between nodes needed to trigger a virtual machine migration, in percent. |
10 |
| Numa.RebalanceEnable | Enable NUMA rebalancing and scheduling. Set this optionto 0 to disable all NUMA rebalancing and initial placementof virtual machines, effectively disabling the NUMA
scheduling system. |
1 |
| Numa.RebalanceCoresTotal | Specifies the minimum number of total processor cores onthe host required to enable the NUMA rebalancer. | 4 |
| Numa.RebalanceCoresNode | Specifies the minimum number of processor cores per noderequired to enable the NUMA rebalancer.This option and Numa.RebalanceCoresTotal are useful
when disabling NUMA rebalancing on small NUMA configurations (for example, two-way Opteron hosts), where the small number of total or per-node processors can compromise scheduling fairness when you enable NUMA rebalancing. |
2 |
| Numa.AutoMemAffinity | Automatically set memory affinity for virtual machines thathave CPU affinity set. | 1 |
| Numa.PageMigEnable | Automatically migrate pages between NUMA nodes toimprove memory locality. Page migration rates set manuallyare still in effect. | 1 |
Advanced Virtual NUMA Attributes
You can use the advanced virtual NUMA attributes to customize virtual NUMA usage.
| Attribute | Description | Default |
| cpuid.coresPerSocket | Determines the number of virtual cores per virtual CPUsocket. If the value is greater than 1, also determines the sizeof virtual NUMA nodes if a virtual machine has a virtual
NUMA topology. You can set this option if you know the exact virtual NUMA topology for each physical host. |
1 |
| numa.autosize | When you set this option, the virtual NUMA topology hasthe same number of virtual CPUs per virtual node as thereare cores on each physical node. | FALSE |
| numa.autosize.once | When you create a virtual machine template with thesesettings, the settings are guaranteed to remain the sameevery time you subsequently power on the virtual machine.
The virtual NUMA topology will be reevaluated if the configured number of virtual CPUs on the virtual machine is modified. |
TRUE |
| numa.vcpu.maxPerVirtualNode | If cpuid.coresPerSocket is too restrictive as a power oftwo, you can set numa.vcpu.maxPerVirtualNode directly.In this case, do not set cpuid.coresPerSocket. | 8 |
| numa.vcpu.min | Minimum number of virtual CPUs in a virtual machine thatare required in order to generate a virtual NUMA topology. | 9 |
| numa.vcpu.maxPerMachineNode | Maximum number of virtual CPUs that belong to the samevirtual machine that can be scheduled on a NUMA node atthe same time. Use this attribute to ensure maximum
bandwidth, by forcing different NUMA clients on different NUMA nodes. |
Number ofcores pernode on the
physical host where a virtual machine is running. |
| numa.vcpu.maxPerClient | Maximum number of virtual CPUs in a NUMA client. Aclient is a group of virtual CPUs that are NUMA-managedas a single entity. By default, each virtual NUMA node is a
NUMA client, but if a virtual NUMA node is larger than a physical NUMA node, a single virtual NUMA node can be backed by multiple NUMA clients. |
Equalsnuma.vcpu.maxPerMachin
eNode |
| numa.nodeAffinity | Constrains the set of NUMA nodes on which a virtualmachine’s virtual CPU and memory can be scheduled.NOTE When you constrain NUMA node affinities, you
might interfere with the ability of the NUMA scheduler to rebalance virtual machines across NUMA nodes for fairness. Specify NUMA node affinity only after you consider the rebalancing issues. |
|
| numa.mem.interleave | Specifies whether the memory allocated to a virtual machineis statically interleaved across all the NUMA nodes onwhich its constituent NUMA clients are running and there
is no virtual NUMA topology exposed. |
True |
Advanced Virtual Machine Attributes
You can use the advanced virtual machine attributes to customize virtual machine configuration.
| Attribute | Description | Default |
| sched.mem.maxmemctl | Maximum amount of memory reclaimed from theselected virtual machine by ballooning, in megabytes(MB). If the ESXi host needs to reclaim additional
memory, it is forced to swap. Swapping is less desirable than ballooning. |
-1 (Unlimited) |
| sched.mem.pshare.enable | Enables memory sharing for a selected virtualmachine.This boolean value defaults to True. If you set it to False
for a virtual machine, this turns off memory sharing. |
True |
| sched.swap.persist | Specifies whether the virtual machine’s swap filesshould persist or be deleted when the virtual machineis powered off. By default, the system creates the swap
file for a virtual machine when the virtual machine is powered on, and deletes the swap file when the virtual machine is powered off. |
False |
| sched.swap.dir | VMFS directory location of the virtual machine’s swapfile. Defaults to the virtual machine’s workingdirectory, that is, the VMFS directory that contains its
configuration file. This directory must remain on a host that is accessible to the virtual machine. If you move the virtual machine (or any clones created from it), you might need to reset this attribute. |
Equals workingDir |
Configure and apply advanced Virtual Machine attributes
Official Documentation:
vSphere Resource Management Guide, Chapter 14, Advanced Attributes, Page 101 describes how to set advanced Host attributes and Virtual Machine Attributes.
See previous objective.
Configure advanced cluster attributes
Official Documentation:
See Duncan Eppings blog post on advanced cluster attributes: http://www.yellow-bricks.com/vmware-high-availability-deepdiv/#HA-advancedsettings
Other exam notes
- The Saffageek VCAP5-DCA Objectives http://thesaffageek.co.uk/vcap5-dca-objectives/
- Paul Grevink The VCAP5-DCA diaries http://paulgrevink.wordpress.com/the-vcap5-dca-diaries/
- Edward Grigson VCAP5-DCA notes http://www.vexperienced.co.uk/vcap5-dca/
- Jason Langer VCAP5-DCA notes http://www.virtuallanger.com/vcap-dca-5/
- The Foglite VCAP5-DCA notes http://thefoglite.com/vcap-dca5-objective/
VMware vSphere official documentation
| VMware vSphere Basics Guide | html | epub | mobi | |
| vSphere Installation and Setup Guide | html | epub | mobi | |
| vSphere Upgrade Guide | html | epub | mobi | |
| vCenter Server and Host Management Guide | html | epub | mobi | |
| vSphere Virtual Machine Administration Guide | html | epub | mobi | |
| vSphere Host Profiles Guide | html | epub | mobi | |
| vSphere Networking Guide | html | epub | mobi | |
| vSphere Storage Guide | html | epub | mobi | |
| vSphere Security Guide | html | epub | mobi | |
| vSphere Resource Management Guide | html | epub | mobi | |
| vSphere Availability Guide | html | epub | mobi | |
| vSphere Monitoring and Performance Guide | html | epub | mobi | |
| vSphere Troubleshooting | html | epub | mobi | |
| VMware vSphere Examples and Scenarios Guide | html | epub | mobi |
Disclaimer.
The information in this article is provided “AS IS” with no warranties, and confers no rights. This article does not represent the thoughts, intentions, plans or strategies of my employer. It is solely my opinion.