Tag Archives: Windows 2008

After partition extend file system displays wrong disk size in Windows

Recently I was working on a VM that has some free space problems on the Exchange partition of a Windows 2008 SBS server. So I extend the hard disk in VMware and Windows. That’s easy….

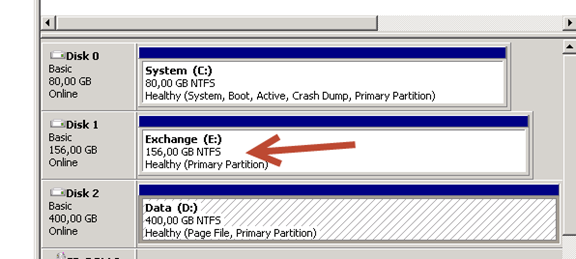
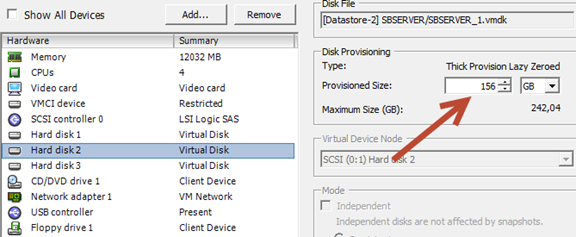
I extended the Hard disk size in VMware. Then I extended the Disk size in the Disk Management tool. All without any problems. But when I was checking the disk size in the Windows Explorer the size was incorrect. The old size was still showing. This is not good!!


Screenshot of the hard disk size in VMware.


Screenshot of the disk size in Storage Manager.


Screenshot of the disk size in Windows Explorer.

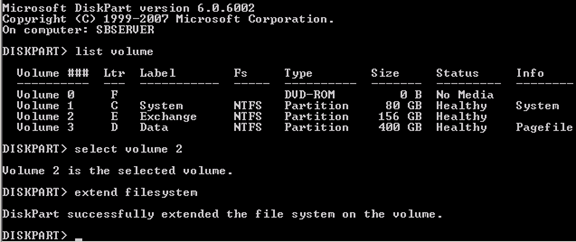
The fix is simple, open an elevated command prompt and start DISKPART

List all volumes of the server.

DISKPART> list volume

Select the volume that has the wrong file system size. x is the ID of the effected volume.

DISKPART> select volume [x]

Extend the file system

DISKPART> extend filesystem
 

Screenshot of the Diskpart commands.

If all went well diskpart fixes the size of the file system.

Go to the Explorer and the correct disk size is shown. Problem solved.
 

Screenshot of the corrected disk size in Windows Explorer.

In place Windows 2008 R2 Standard to Enterprise upgrade

Last week I needed to upgrade a Windows 2008R2 Standard edition server to an Enterprise edition.

In 2008 & 2008R2 this is a piece of cake. Follow the next instructions and you are up and running in a minute.

Source: http://jamiebaldanza.org/2010/09/08/in-place-windows-server-2008-r2-standard-to-enterprise-upgrade/

Using DISM you are able to do an in place upgrade to a different version of the OS. Below are the steps required to do so.

1. List Current Version of OS

2. List Upgrade Options

3. Set the edition you want and key you are assigned for the enterprise edition.

Problems:

If you receive ” The specified product key is not valid for the target edition. “ Verify the information is typed correctly. If you still receive the error upgrade with a temporary key from Microsoft 489J6-VHDMP-X63PK-3K798-CPX3Y and then once upgraded log in and activate with your key. I was able to get mine to successfully register after a couple tries.

Windows 2008R2 sysprep crashes. Autochk not found

Today I created a clone from a VM that was running. After the clone was completed I disconnected the network card an booted the VM. No problem everything worked. I needed this Cloned VM for a test domain so I syspreped the VM. After booting the VM an error is shown “autochk program not found” after the error a BSOD is shown and the VM reboots.

I started googling and found the solution in the VMware Community pages, see: http://communities.vmware.com/thread/288439?start=15&tstart=0

The sollutions is simpel, boot the VM from the Windows 2008R2 DVD and go the  command prompt. Type the following commands.

diskpart
list volume
select volume 1
attributes volume
attributes volume clear nodefaultdriveletter

Reboot the VM and now the SYSPREP continues.

Remove Powershell and Server Manager Pinned Items from taskbar

To do this, create a new GPO and drill down to: Computer configuration->Policies->Windows settings->Security Settings->File System
Add each file below, removing Users from the permissions so it’s only Administrators, Creator Owner and System:

  • %AllUsersProfile%\Microsoft\Windows\Start Menu\Programs\Accessories\Windows PowerShell\Windows PowerShell.lnk
  • %AllUsersProfile%\Microsoft\Windows\Start Menu\Programs\Administrative Tools\Server Manager.lnk
  • %AllUsersProfile%\Microsoft\Windows\Start Menu\Programs\Administrative Tools\Windows PowerShell Modules.lnk

Keep in mind the path for %AllUsersProfile% is typically C:\ProgramData.  When you add the files using Group Policy Management you will select the files by drilling down to C:\ProgramData, Microsoft, Windows, Start Menu, etc, but you will notice when you’ve added them it auto-magically changes the path %AllUsersProfile%.
Use the “Configure this file or folder and propagate inheritable permissions to all subfolders and files” option on all three files.  Make sure to attach the new OU to your RDS OU or modify your existing RDS GPO. Run gpupdate /force from the command prompt on your RDS servers after adding/modifying this GPO and you’re ready to go!

Off course you can also configure the security settings manually or script.

icacls "%ProgramData%\Microsoft\Windows\Start Menu\Programs\Accessories\Windows PowerShell" /T /inheritance:d
icacls "%ProgramData%\Microsoft\Windows\Start Menu\Programs\Accessories\Windows PowerShell" /T /remove:g "BUILTIN\Users" Everyone
icacls "%ProgramData%\Microsoft\Windows\Start Menu\Programs\Administrative Tools\Server Manager.lnk" /inheritance:d
icacls "%ProgramData%\Microsoft\Windows\Start Menu\Programs\Administrative Tools\Server Manager.lnk" /remove:g "BUILTIN\Users" Everyone

** Update 25-02-2013 **

A colleague of mine has also written a blog about the same problem. He solved the problem with a group policy. For his solution see: http://www.emware.nl/articles/remove-server-manager-and-powershell-icons-from-taskbar.html

Windows 2008 virtual machines lose their Gateway IP address after rebooting

I was working on a Windows 2008 Server in an segmented network. This was a fresh new installation of Windows 2008. After a reboot the server was not reachable from another VLan. After some troubleshooting I found the problem. The gateway address has disappeared. Strange, so I started searching on the internet and I found an Knowledgebase article at the VMware site describing my problem, this is VMware KB1016878.

Symptoms

  • After every reboot, Windows 2008 virtual machines lose their Gateway IP address.
  • Gateway IP address is lost or reset after rebooting

Resolution

This issue may occur if there is a problem with the registry keys DefaultGateway and DefaultGatewayMetric.

Microsoft has identified this issue and has released a hotfix. For more information and to download the hotfix, see the Microsoft Knowledge Base article 973243.

To work around this issue:

  1. From the Windows Registry Editor, navigate to HKLM/System/CurrentControlSet/Services/Tcpip/Parameters/Interfaces/%CLSID%.
  2. Check the DefaultGateway and DefaultGatewayMetric keys for issues. For example:
  • Remove any newline feeds before the correct default gateway IP
  • If the address is missing, add it manually.

Device Manager is running in read-only mode

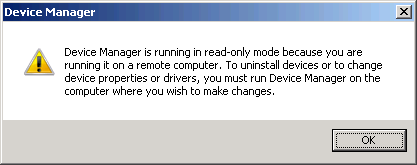
Today I was creating a template for my VMware environment, when I was trying to change the graphical interface card I was running into some problems. This is the message the Device Manager is giving me.

The result is that I cannot change any drivers or devices.

The solution is very simple but not obvious. My computer name is longer than 15 characters. This is a problem for NetBIOS computers. It turns out this is also a problem for the device manager. So I changed my computer name to a name with less than 15 characters, now everything works normal again.

Reset Domain Administrator Password

A Client of our company had a problem, they got in an argument with their current IT Management company. Eventually the IT Management company wouldn’t give up the administrator account password of the complete domain. So this client was locked out of his own network. We were asked if there was a way to reset this password. So I started looking on the internet for some solutions.

The first one I tried in my own lab was the one that Daniel Petri describes in het Blog post at: http://www.petri.co.il/reset_domain_admin_password_in_windows_server_2003_ad.htm

There were some requirements for this trick.

  • Local access to the domain controller (DC).
  • The Local Administrator password.
  • Two tools provided by Microsoft in their Resource Kit: SRVANY and INSTSRV. Download them from HERE (24kb).

The first one was no problem, but the second one in my case was a problem, we didn’t no the local administrator password.

So this is how I did it, first of all download the DART tools (Diagnostics and Recovery Toolset) from the Microsoft website, this is available for MDOP License owners. See http://www.microsoft.com/windows/enterprise/products/mdop/dart.aspx

There are other ways to get your hands on this tool, go to the Technet site and get a Technet Subscription. And if you don’t have access to both sources, go search Google.

I restarted the domain domain controller, and boot into the DART tool. Go to the Locksmith tool, and reset the password of the Administator account. Reboot the server, in Active Directory Recovery mode. This is important because now the Local accounts are available for logon. The local accounts are disabled on a Domain Controller, this is by design. In recovery mode logon with your new local Administrator password. Now do the trick that Daniel Petri describes in his post.

This is how it works globally.

Step 1

Restart Windows 2003 in Directory Service Restore Mode.

Note: At startup, press F8 and choose Directory Service Restore Mode. It disables Active Directory. When the login screen appears, log on as Local Administrator. You now have full access to the computer resources, but you cannot make any changes to Active Directory.

clip_image001

Step 2

You are now going to install SRVANY. This utility can virtually run any programs as a service. The interesting point is that the program will have SYSTEM privileges (LSA) (as it inherits the SRVANY security descriptor), i.e. it will have full access on the system. That is more than enough to reset a Domain Admin password. You will configure SRVANY to start the command prompt (which will run the ‘net user’ command).

Copy SRVANY and INSTSRV to a temporary folder, mine is called D:\temp. Copy cmd.exe to this folder too (cmd.exe is the command prompt, usually located at %WINDIR%\System32).

Start a command prompt, point to d:\temp (or whatever you call it), and type:

instsrv PassRecovery "d:\temp\srvany.exe"

(change the path to suit your own).

It is now time to configure SRVANY.

Start Regedit, and navigate to

HKEY_LOCAL_MACHINE\System\CurrentControlSet\Services\PassRecovery

Create a new subkey called Parameters and add two new values:

name: Application

type: REG_SZ (string)

value: d:\temp\cmd.exe

name: AppParameters

type: REG_SZ (string)

value: /k net user administrator 123456 /domain

Replace 123456 with the password you want. Keep in my mind that the default domain policy require complex passwords (including digits, respecting a minimal length etc) so unless you’ve changed the default domain policy use a complex password such as P@ssw0rd

Now open the Services applet (Control Panel\Administrative Tools\Services) and open the PassRecovery property tab. Check the starting mode is set to Automatic.

clip_image002

Go to the Log On tab and enable the option Allow service to interact with the desktop.

Restart Windows normally, SRVANY will run the NET USER command and reset the domain admin password.

Step 3

Log on with the Administrator’s account and the password you’ve set in step #2.

Use this command prompt to uninstall SRVANY (do not forget to do it!) by typing:

net stop PassRecovery

sc delete PassRecovery

Now delete d:\temp and change the admin password if you fancy.

Done!
Microsoft Test Lab Guides

Recently Microsoft released a lot of Lab Guides for different Microsoft products to test. See http://social.technet.microsoft.com/wiki/contents/articles/test-lab-guides.aspx

Test Lab Guides

Test lab guides (TLGs) allow you to get valuable hands-on experience with new products and technologies using a pre-defined and tested methodology that results in a working configuration. When you use a TLG to create a test lab, instructions define what servers to create, how to configure the operating systems and system services, and how to install and configure any additional products or technologies. A TLG experience enables you to see all of the components and the configuration steps on both the front-end and back-end that are required for a product or technology or for a multi-product or technology solution.

A challenge in creating useful TLGs is to enable their reusability and extensibility. Because creating a test lab can represent a significant investment of time and resources, your ability to reuse and extend the work required to create test labs is important. An ideal test lab environment would enable you to create a basic lab configuration, save that configuration, and then build out multiple test lab scenarios in the future by starting with the base configuration.

For a test lab based on physical computers, you can image the drives for future test labs. For a test lab based on virtual machines, you can create snapshots for future test labs. This allows you to easily return to a desired configuration for further learning and experimentation.

The types of TLG documents are the following:

  • Base configuration TLG
  • Modular TLGs
  • TLG extensions
  • Troubleshooting TLGs
  • Test lab troubleshooting scenarios
  • TLG portal pages

Base Configuration TLG

The Base Configuration TLG allows you to create the base configuration test lab, upon which you can build test labs based on other TLGs from Microsoft, TLG extensions in the TechNet Wiki, or a test lab of your own design that can include Microsoft or non-Microsoft products.

The base configuration TLG is just the beginning of the test lab experience. Other TLGs or TLG extensions in the TechNet Wiki focus on Microsoft products or platform technologies, but all of them use the Base Configuration TLG as a starting point.

After configuring the computers of the base configuration test lab, make sure that you perform a disk image on each computer if you are using physical computers, or perform virtual machine snapshots if you are using virtual machines.

Modular TLGs

A modular TLG describes how to set up and demonstrate a technology, product, or solution for either the Base Configuration test lab or a test lab based on another modular TLG.

The following modular TLGs are available:

To create your own modular TLG in the TechNet Wiki, see the Wiki: Modular Test Lab Guide Template.

TLG Extensions

A TLG extension article, published in the TechNet Wiki, describes how to configure additional functionality or advanced or uncommon configurations based on a working test lab. A TLG extension extends a modular TLG.

The TLG extension article includes instructions to configure and test the additional functionality, and then manually restore the test lab to its original state. A TLG extension article also includes virtualization advice so that you can create snapshots to store the modified test lab configuration and easily restore the original working test lab configuration.

Examples of TLG extensions are the following:

To create your own TLG extension, see Wiki: Test Lab Extension Template.

Troubleshooting TLGs

A troubleshooting TLG describes the troubleshooting tools and how they appear in a working test lab for a technology, product, or multi-technology and product solution. The working test lab is typically based on a modular TLG.

A troubleshooting TLG also takes you through a set of troubleshooting scenarios. Each troubleshooting scenario steps you through the following:

  • Breaking the configuration of the test lab in a specific way
  • Demonstrating the effect on the technology or product functionality
  • Performing root cause analysis of the problem using the troubleshooting tools and recommended troubleshooting techniques
  • Correcting the problem

The following troubleshooting TLGs are available:

To create your own troubleshooting TLG in the TechNet Wiki, see the Wiki: Troubleshooting Test Lab Guide Template.

Test Lab Troubleshooting Scenarios

A test lab troubleshooting scenario, published in the TechNet Wiki, provides an additional scenario to demonstrate the results of a misconfiguration or other type of common problem and guide the reader through the root cause determination and correction. Test lab troubleshooting scenarios extend a troubleshooting TLG.

For an example of a test lab troubleshooting scenario, click here.

To create your own test lab troubleshooting scenario, see Wiki: Test Lab Troubleshooting Scenario Template.

TLG Portal Pages

A TLG portal page is a TechNet Wiki article that provides links to all of the resources for a specific technology or product.

The following TLG portal pages are available:

Additional Resources

For the latest information about TLGs, see the Microsoft TLG blog.

Hyper-V How To: Plan Performance

Good read from Microsoft. Source : http://blogs.technet.com/tonyso/archive/2009/11/30/hyper-v-how-to-plan-performance.aspx

Customers often ask “Given a hardware load-out X, how many Ys can I get/run/host?”

The frustrating answer always starts with “…it depends…”. We caveat this way not because we want to frustrate, but because it is true. Many teams will go on to say “We have tested the following in our labs and gotten the displayed results…”

1 X = thingy

2 X = more thingies

3X = many more thingies

While accurate, not super-helpful.

The truth is that to do good perf planning for Hyper-V you have to run some tests.

Run them using your actual production load (converted to Virtual Machines) in a test environment.

TIP: you can download the free VHD version of SCVMM, then run it as a VM to convert your production machines to “test” virtual machines.

Then play with your assumptions and tweak things higher and lower and to your design tolerance and actually observe how perf goes.

Add an overhead/forgot-to-test percentage, done.

Continue reading