Knowledge
- Identify custom installation options
- Identify ESXi Image Builder requirements
Skills and Abilities
- Create/Edit Image Profiles
- Install/uninstall custom drivers
- Configure advanced boot loader options
- Configure kernel options
-
Given a scenario, determine when to customize a configuration
Create/Edit Image Profiles
Official Documentation:
vSphere Installation and Setup Guide, Chapter 6 “Using vSphere ESXi Image Builder CLI”, page 123.
The ESXi Image Builder CLI is a set of PowerCLI cmdlets that you can use to manage vSphere image profiles and VIB packages, such as driver VIBs and update VIBs. You can also use Image Builder cmdlets to export an image profile to an ISO or offline depot ZIP file that you can use to install ESXi with a customized set of updates, patches, and drivers.
Understanding Image Builder
You can use the vSphere® ESXi™ Image Builder CLI to manage software depots, image profiles, and software packages (VIBs). Image profiles and VIBs specify the software you want to use during installation or upgrade of an ESXi host.
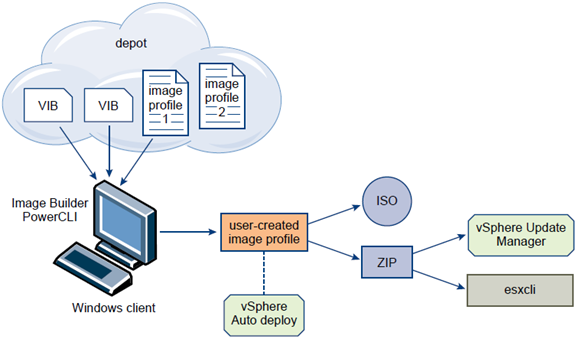
Image Builder Overview
The Image Builder PowerCLI supports management of vSphere image profiles and VIBs.
You can manage VIBs and image profiles with vSphere Image Builder. VIBs are software packages, and image profiles specify a set of software packages. See “Software Depots and Their Components,” on page 124.
You use Image Builder cmdlets for managing the software to deploy to your ESXi hosts in several different scenarios.
| Create image profiles foruse by Auto Deploy. | Use Image Builder to create an image profile that defines the VIBs that AutoDeploy uses to provision hosts. |
| Add custom third-partydrivers to existing image
profile and export to ISO. |
To add third-party driver or extension custom VIBs to your ESXi hosts, useImage builder to clone the base image provided by VMware, add the custom
VIBs, and export to ISO. |
| Perform upgrades. | If you upgrade from a 4.0 or 4.1 system that includes custom extensions ordrivers, you can use Image Builder to create an image profile that includes the
vSphere 5.0 base VIB and the custom extensions. Export the custom image profile to an ISO you can install or to a ZIP that you can use with vSphere Update Manager. |
| Create custom imageswith reduced footprint. | Some customers require a minimal footprint image. These customers can clonethe ESXi base image profile and remove VIBs using Image Builder. |
The Image Builder PowerCLI cmdlets take image profiles and VIBs as input and produce different outputs.
| Input. | Image profiles and VIBs that are located in a software depot are used as inputto PowerCLI cmdlets running on a Windows client. |
| Output. | PowerCLI cmdlets create custom image profiles that can be exported to ISO oran offline depot ZIP file. ISO images are used for installation. The ZIP depot
can be used by vSphere Update Manager or by esxcli software vib commands to update or install images. Image profiles are also used in vSphere Auto Deploy rules to specify the software to provision ESXi hosts with. |
Image Builder Architecture
Create an Image Profile
Cloning a published profile is the easiest way to create a custom image profile. Cloning a profile is especially useful if you want to remove a few VIBs from a profile, or if you want to use hosts from different vendors and want to use the same basic profile, but want to add vendor-specific VIBs. VMware partners or large installations might consider creating a profile from scratch.
Administrators performing this task must have some experience with PowerCLI or Microsoft PowerShell.
Prerequisites
- Install the VMware PowerCLI and all prerequisite software. See “Image Builder Installation and Usage,” on page 130.
- Verify that you have access to the software depot that contains the image profile you want to clone.
- If you encounter problems running PowerCLI cmdlets, consider changing the execution policy. See “Using Image Builder Cmdlets,” on page 130.
Procedure
- At the PowerShell prompt, add the depot that contains the profile you want to clone to the current session.
| Depot Type | Cmdlet |
| Remote depot | Run Add-EsxSoftwareDepot -DepotUrl depot_url. |
| ZIP file |
|
The cmdlet returns one or more SoftwareDepot objects.
- (Optional) Run the Get-EsxImageProfile cmdlet to find the name of the profile that you want to clone.
Get-ESXImageProfile
You can use filtering options with Get-EsxImageProfile.
- Run the New-EsxImageProfile cmdlet to create the new profile and use the -CloneProfile parameter to specify the profile you want to clone.
New-EsxImageProfile -CloneProfile My_Profile -Name “Test Profile 42”
This example clones the profile named My-Profile and assigns it the name Test Profile 42. You must specify a unique combination of name and vendor for the cloned profile.
Add VIBs to an Image Profile
You can add one or more VIBs to an image profile if that image profile is not set to ReadOnly. If the new VIB depends on other VIBs or conflicts with other VIBs in the profile, a message is displayed at the PowerShell prompt and the VIB is not added.
You can add VIBs from VMware or from VMware partners to an image profile. If you add VMware VIBs, the Image Builder PowerCLI performs validation. If you add VIBs from two or more OEM partners, no errors are reported but the resulting image profile might not work. Install VIBs from only one OEM vendor at a time.
NOTE You might be able to add VIBs even if the resulting image profile is invalid.
Administrators performing this task must have some experience with PowerCLI or Microsoft PowerShell.
Prerequisites
- Install the VMware PowerCLI and all prerequisite software. See “Install Image Builder PowerCLI and Prerequisite Software,” on page 130.
- If you encounter problems running PowerCLI cmdlets, consider changing the execution policy. See “Using Image Builder Cmdlets,” on page 130.
Procedure
- Run Add-EsxSoftwareDepot for each depot you want to work with.
| Depot Type | Cmdlet |
| Remote depot | Run Add-EsxSoftwareDepot -DepotUrl depot_url. |
| ZIP file |
|
The cmdlet returns one or more SoftwareDepot objects.
- Run Get-EsxImageProfile to list all image profiles in all currently visible depots.
Get-EsxImageProfile
The cmdlet returns all available profiles. You can narrow your search by using the optional arguments to filter the output.
- Clone the profile and make changes to the clone if the image profile is read only.
New-EsxImageProfile -CloneProfile My_Profile -Name “Test Profile 42” Image profiles published by VMware and its partners are read only.
- Run Add-EsxSoftwarePackage to add a new package to one of the image profile.
Add-EsxSoftwarePackage -ImageProfile My_Profile -SoftwarePackage partner-package
The cmdlet runs the standard validation tests on the image profile. If validation succeeds, the cmdlet returns a modified, validated image profile. If the VIB that you want to add depends on a different VIB, the cmdlet displays that information and includes the VIB that would resolve the dependency. If the acceptance level of the VIB that you want to add is lower than the image profile acceptance level, an error results. Change the acceptance level of the image profile to add the VIB.
- (Optional)Change the acceptance level of the image profile if an error about acceptance level problems displays.
VIB acceptance levels are set during VIB creation and cannot be changed.
The image profile includes the new VIB.
Install/uninstall custom drivers
Official Documentation:
VMware KB 2005205 “Installing async drivers on ESXi 5.0”.
This article provides the different methods for installing asynchronous driver releases on multiple versions of VMware ESXi 5.0, 5.1, and 5.5. For more information about installing a specific async driver release, see the /doc/README.txt file within the async driver release zip file.
Async drivers are developed by third-party vendors and are subjected to the VMware certification process. They are released in a ESXi software package called a vSphere Installation Bundle (VIB). To download async drivers signed by VMware, visit VMware Downloads.
Prior to a new ESXi installation
An ESXi 5.x fresh installation using a CD or ISO does not provide any option to inject an async driver. Instead, you must use Image Builder to inject the async driver into a new CD or ISO image. For more information, see the Using vSphere ESXi Image Builder CLI section of the vSphere Installation and Setup Guide.
Note: These steps are necessary if the async driver is required for the ESXi server to have network connectivity.
To add async drivers to the ESXi installation ISO:
- Launch the vSphere 5.x PowerCLI command line.
- Download a copy of the ESXi offline bundle depot and async driver zip file.
- Extract the contents of the async driver zip file and identify the offline-bundle.zip files(s).
- Use the Add-ESXSoftwareDepot commandlet to add both the ESXi offline bundle and async offline bundle as depots.
For example:
Add-EsxSoftwareDepot C:\path\to\new-async-driver-offline-bundle.zip, C:\path\to\esxi-offline-bundle.zip
Example for ESXi 5.0:
Add-EsxSoftwareDepot C:\path\to\new-async-driver-offline-bundle.zip, C:\path\to\VMware-ESXi-5.0.0-469512-depot.zip
Example for ESXi 5.0 Update 1:
Add-EsxSoftwareDepot C:\path\to\new-async-driver-offline-bundle.zip, C:\path\to\update-from-esxi5.0-5.0_update01.zip
The output appears similar to:
Depot Url
———
zip:C:\path\to\new-async-driver-offline-bundle.zip?index.xml
zip:C:\VMware-ESXi-5.0.0-469512-depot.zip?index.xml - Verify that the async driver is now available as a software package.
For example:
Get-EsxSoftwarePackage
The output appears similar to:
Name Version Vendor Release Date
——————- ——- ———- ————
driver-package-name 1.2.3.4 vendorname mm/dd/yyyy - Clone an existing image profile:
- Use the Get-EsxImageProfile commandlet to list available image profiles.
For example:
Get-EsxImageProfile
The output appears similar to:
Name Vendor Last Modified Acceptance
————————– —— ————- —————
ESXi-5.0.0-456551-standard VMware mm/dd/yyyy PartnerSupported
ESXi-5.0.0-456551-no-tools VMware mm/dd/yyyy PartnerSupported - Clone an existing available image profile by specifying a new name for the profile.
For example:
New-EsxImageProfile -CloneProfile “ESXi-5.0.0-456551-standard” -name “NewAsyncProfile” -Vendor “MyCorp”
The output appears similar to:
Name Vendor Last Modified Acceptance Level
————— —— ————- —————-
NewAsyncProfile MyCorp mm/dd/yyyy PartnerSupported - Use the Add-EsxSoftwarePackage commandlet to add the async driver to the new image profile, specifying the package name from step 5.
For example:
Add-EsxSoftwarePackage -ImageProfile “NewAsyncProfile” -SoftwarePackage “driver-package-name”
The output appears similar to:
Name Vendor Last Modified Acceptance Level
————— —— ————- —————-
NewAsyncProfile VMware today PartnerSupported - Export the new image profile. Run the Export-EsxImageProfile command to export the image profile as an ISO.
For example:
Export-EsxImageProfile -ImageProfile “NewAsyncProfile” -ExportToISO -filepath C:\NewAsyncProfile.iso - If necessary, burn the ISO to a new CD. Use the CD or ISO to boot the server and install ESXi. Follow the normal installation procedures.
Existing ESXi installation using esxcli and offline bundle async driver zip file
You can install async drivers on an existing ESXi host from a specific VIB file, from a depot URL, from an offline bundle, or using an image profile. For more information, see Upgrading and Migrating Your Hosts – Performing the Upgrade or Migration in the vSphere Upgrade Guide.
The offline bundle zip file is copied to the ESXi host using the datastore browser, and is installed using the esxcli utility in the ESXi shell.
Note: This requires remote ESXi network connectivity using the vSphere Client.
To install the async drivers:
- Extract the contents of the async driver zip file.
- Identify the offline-bundle.zip file(s).
- Log into the ESXi host using the vSphere Client with administrator privileges, such as root.
- Using the Datastore Browser, upload the offline-bundle.zip file(s) to an ESXi host’s datastore.
- Enter the host into maintenance mode.
- Log in as root to the ESXi console through SSH or iLO/DRAC.
-
Copy the offline-bundle.zip to /var/log/vmware folder by running the below command
cp offline-bundle.zip /var/log/vmware -
Run this command to install drivers using the offline bundle (this requires an absolute path):
esxcli software vib install –d /path/offline-bundle.zip
For example:
esxcli software vib install –d /var/log/vmware/offline-bundle.zip
Note: If this command fails, unzip the file and try running the same command. Use localcli instead of esxcli if the hostd is not responding.
For example
localcli software vib install –d /var/log/vmware/offline-bundle.zip -
Reboot the ESXi host.
-
You can run the below command to confirm that the VIB is installed successfully or not
esxcli software vib list | grep -i <vib_name> -
Exit maintenance mode.
Note: An ESX host can be updated remotely using the esxcli utility, which is part of the vSphere CLI. For more details on using esxcli, see the vSphere Command-Line Interface Documentation page.
Existing ESXi installation using esxcli and async driver VIB file
You can install async drivers on an existing ESXi host from an async driver VIB file. The VIB file is copied to the ESXi host using the datastore browser, and installed using esxcli in the ESXi shell.
Note: This requires remote ESXi network connectivity using the vSphere Client.
To install the async drivers:
- Extract the contents of the async driver zip file.
- Identify the offline-bundle.zip file(s).
- Extract the contents of the offline-bundle.zip file(s).
- Identify the async-driver.vib file(s).
- Log into the ESXi host using the vSphere Client with administrator privileges, such as root.
- Using the Datastore Browser, upload the async-driver.vib file(s) to an ESXi host’s datastore.
- Enter the host into maintenance mode.
- Log in as root to the ESXi console through SSH or iLO/DRAC.
-
Run this command to install drivers from the VIB file (this requires an absolute path):
esxcli software vib install –n /path/async-driver.vib
For example:
esxcli software vib install –n /vmfs/volumes/datastore/async-driver.vib
Note: Use localcli instead of esxcli if the hostd is not responding. For example
localcli software vib install –n /vmfs/volumes/datastore/async-driver.vib -
Reboot the ESXi host.
-
To confirm if the VIB is installed successfully, run the command:
esxcli software vib list | grep -i vib_name -
Exit maintenance mode.
Note: An ESX host can be updated remotely using the esxcli utility, which is part of the vSphere CLI. For more information on using esxcli, see the vSphere Command-Line Interface Documentation page.
Existing ESXi installation using VMware Update Manager
You can install async drivers on an existing ESXi host using VMware Update Manager. For more information, see Using vSphere ESXi Image Builder CLI in the vSphere Installation and Setup Guide.
Note: Async drivers are developed by third-party vendors and are subjected to VMware certification. Third-party vendors provide recommendations/suggestions to upgrade their drivers/firmware for specific versions of ESXi/ESX. Therefore, VMware does not include these async drivers automatically in Update Manager.
To install the async drivers:
- Extract the contents of the async driver zip file.
- Identify the offline-bundle.zip file(s).
- From vCenter Server, go to Home > Update Manager.
- Click the Patch Repository tab.
- Click the Import Patches link at the top right of the screen.
- Click Finish. The async driver is added to the patch repository.
- Create a Host Extension baseline and remediate the ESXi host. For more information, see the Update Manager Administration Guide.
- Reboot the ESXi host once the remediation is complete.
Note: This guide can be found on the vSphere Update Manager Documentation page.
Configure advanced boot loader options
Official Documentation:
vSphere Installation and Setup Guide, Chapter 4 “Installing, Upgrading, or Migrating Hosts Using a Script”, Section “Enter Boot Options to Start an Installation or Upgrade Script”, page 48.
You can start an installation or upgrade script by typing boot command-line options at the boot command line.
At boot time you might need to specify options to access the kickstart file. You can enter boot options by pressing Shift+O in the boot loader. For a PXE boot installation, you can pass options through the kernel opts line of the boot.cfgfile. See “About the boot.cfg File,”on page 58 and “PXE Booting the ESXi Installer,”on page 19.
A ks=… option must be given, to specify the location of the installation script. Otherwise, a scripted installation or upgrade will not start. If ks=… is omitted, the text installer will proceed.
Procedure
- Start the host.
-
When the ESXi installer window appears, press Shift+O to edit boot options.
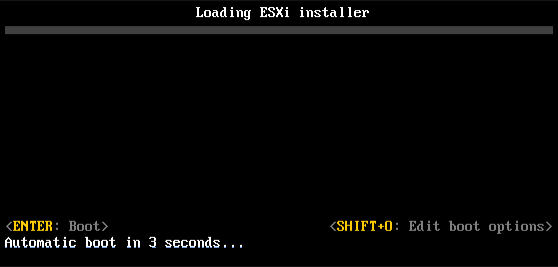
- At the run weasel command prompt, type
ks=location of installation script plus boot command line options
Example: Boot Option
You type the following boot options:
ks=http://00.00.00.00/kickstart/ks-osdc-pdp101.cfg nameserver=00.00.0.0 ip=00.00.00.000 netmask=255.255.255.0 gateway=00.00.00.000
More information:
- VMware KB 2004582 “Deploying ESXi 5.0 using the Scripted Install feature”
- ESXi 5.0 and Scripted Installs by Duncan Epping.
Configure kernel options
Official Documentation:
vSphere Installation and Setup Guide, Chapter 4 “Installing, Upgrading, or Migrating Hosts Using a Script”, Section “About the boot.cfg File”, page 58.
The boot loader configuration file boot.cfg specifies the kernel, the kernel options, and the boot modules that the mboot.c32 boot loader uses in an ESXi installation.
The boot.cfg file is provided in the ESXi installer. You can modify the kerneloptline of the boot.cfg file to specify the location of an installation script or to pass other boot options.
The boot.cfg file has the following syntax:
# boot.cfg — mboot configuration file
#
# Any line preceded with ‘#’ is a comment.
title=STRING
kernel=FILEPATH
kernelopt=STRING
modules=FILEPATH1— FILEPATH2… — FILEPATHn
# Any other line must remain unchanged.
The commands in boot.cfg configure the boot loader.
| Command | Description |
| title=STRING | Sets the boot loader title to STRING |
| kernel=FILEPATH | Sets the kernel path to FILEPATH |
| kernelopt=STRING | Appends STRING to the kernel boot options. |
| modules=FILEPATH1— FILEPATH2… — FILEPATHn | Lists the modules to be loaded, separated by three hyphens(—). |
Given a scenario, determine when to customize a configuration
Official Documentation:
- vSphere Installation and Setup Guide, Chapter 1 “Introduction to vSphere Installation and Setup”, Section “Options for Installing ESXi”, page 14.
- VMware vSphere® 5.0 Upgrade Best Practices
- VMware KB 2004501 “Methods of upgrading to ESXi 5.0”
- vSphere Upgrade Guide
ESXi can be installed in several ways. To ensure the best vSphere deployment, understand the options thoroughly before beginning the installation.
ESXi installations are designed to accommodate a range of deployment sizes.
Depending on the installation method you choose, different options are available for accessing the installation media and booting the installer.
Interactive ESXi Installation
Interactive installations are recommended for small deployments of fewer than five hosts.
You boot the installer from a CD or DVD, from a bootable USB device, or by PXE booting the installer from a location on the network. You follow the prompts in the installation wizard to install ESXi to disk. See Chapter 3, “Installing ESXi Interactively,”on page 43.
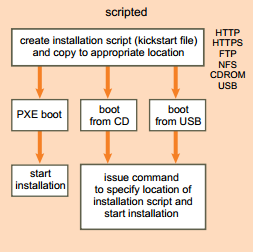
Scripted ESXi Installation
Running a script is an efficient way to deploy multiple ESXi hosts with an unattended installation.
The installation script contains the host configuration settings. You can use the script to configure multiple hosts with the same settings. See Chapter 4, “Installing, Upgrading, or Migrating Hosts Using a Script,”on page 47.
The installation script must be stored in a location that the host can access by HTTP, HTTPS, FTP, NFS, CDROM, or USB. You can PXE boot the ESXi installer or boot it from a CD/DVD or USB drive.
vSphere Auto Deploy ESXi Installation Option
With the vSphere Auto Deploy ESXi Installation, you can provision and reprovision large numbers of ESXi hosts efficiently with vCenter Server.
Using the Auto Deploy feature, vCenter Server loads the ESXi image directly into the host memory. Auto Deploy does not store the ESXi state on the host disk. vCenter Server stores and manages ESXi updates and patching through an image profile, and, optionally, the host configuration through a host profile. You can create image profiles with ESXi Image Builder CLI, and host profiles using the vSphere Client. See Chapter 6, “Using vSphere ESXi Image Builder CLI,”on page 123 and vSphere Host Profiles.
The first time you install a host with Auto Deploy, the host PXE boots and establishes contact with the Auto Deploy server, which streams the image profile and any host profile to the host. The host starts, using the image profile, and Auto Deploy assigns the host to the appropriate vCenter Server system.
When you restart the host, vCenter Server uses the Auto Deploy feature to provision the host with the appropriate image and host profile. If the image profile changes, for example, for an update or patch, the administrator can propagate the change to all hosts that are provisioned with Auto Deploy and managed by a vCenter Server system. This ability makes Auto Deploy an efficient way to provision and reprovision large numbers of hosts, and to enforce compliance to a master ESXi image. See “Understanding vSphere Auto Deploy,”on page 63.
Customizing Installations with ESXi Image Builder CLI
You can use ESXi Image Builder CLI to create ESXi installation images with a customized set of updates, patches, and drivers.
ESXi Image Builder CLI is a PowerShell CLI command set that you can use to create an ESXi installation image with a customized set of ESXi updates and patches. You can also include third-party network or storage drivers that are released between vSphere releases.
You can deploy an ESXi image created with Image Builder in either of the following ways:
- By burning it to an installation DVD.
- Through vCenter Server, using the Auto Deploy feature.
See Chapter 6, “Using vSphere ESXi Image Builder CLI,”on page 123 and Chapter 5, “Installing ESXi Using vSphere Auto Deploy,”on page 63.
Other exam notes
- The Saffageek VCAP5-DCA Objectives http://thesaffageek.co.uk/vcap5-dca-objectives/
- Paul Grevink The VCAP5-DCA diaries http://paulgrevink.wordpress.com/the-vcap5-dca-diaries/
- Edward Grigson VCAP5-DCA notes http://www.vexperienced.co.uk/vcap5-dca/
- Jason Langer VCAP5-DCA notes http://www.virtuallanger.com/vcap-dca-5/
- The Foglite VCAP5-DCA notes http://thefoglite.com/vcap-dca5-objective/
VMware vSphere official documentation
| VMware vSphere Basics Guide | html | epub | mobi | |
| vSphere Installation and Setup Guide | html | epub | mobi | |
| vSphere Upgrade Guide | html | epub | mobi | |
| vCenter Server and Host Management Guide | html | epub | mobi | |
| vSphere Virtual Machine Administration Guide | html | epub | mobi | |
| vSphere Host Profiles Guide | html | epub | mobi | |
| vSphere Networking Guide | html | epub | mobi | |
| vSphere Storage Guide | html | epub | mobi | |
| vSphere Security Guide | html | epub | mobi | |
| vSphere Resource Management Guide | html | epub | mobi | |
| vSphere Availability Guide | html | epub | mobi | |
| vSphere Monitoring and Performance Guide | html | epub | mobi | |
| vSphere Troubleshooting | html | epub | mobi | |
| VMware vSphere Examples and Scenarios Guide | html | epub | mobi |
Disclaimer.
The information in this article is provided “AS IS” with no warranties, and confers no rights. This article does not represent the thoughts, intentions, plans or strategies of my employer. It is solely my opinion.